It is currently Sun May 03, 2026 7:55 am

Board index » General » Buggy Builds

All times are UTC - 5 hours [ DST ]


Post new topic Reply to topic  [ 455 posts ]  Go to page Previous  1, 2, 3, 4, 5, 6, 7 ... 19  Next
Author Message
 Post subject: Re: Rail Buggy Upgrade
PostPosted: Sun Oct 28, 2012 10:14 pm 
Offline
WB Contributor
User avatar

Joined: Thu Sep 06, 2012 2:23 pm
Posts: 1212
Location: Chattanooga Tennessee
Red Barron wrote:
Yes, it will work to get on a stock beam. They can walk if you don't. Kartek phone 951-737-7223 Ask for baja Mike if he is there. They make the shafts to order. They are in California so if you get the message early enough you can call them tonight for pricing. Copy this web address to your browser and it will take you to the page. http://www.kartek.com/Product/DriveTrain/Axles

Both Sets are in stock, Just got off the phone with Baja Mike

Kartek 300M Axles @ 21 1/4" ---$630.00
Sway Away 300M Axles @ 21 3/8"---- $530.00


I have been running the 300M gun drilled shafts in my tank with big power but I also run a 210mm stage I clutch that barely meets my HP and Torque specs. I could have run 4130 but I figured I could afford the upgrade it was cheeper than going all Weddle in the trans (for Now).

The prices above are per pair and come with spec sheets.

_________________
Water Cooled Consortium, Chairman of the Build (Former AC purist)


Top
 Profile  
 
 Post subject: Re: Rail Buggy Upgrade
PostPosted: Mon Oct 29, 2012 12:31 pm 
Offline

Joined: Sun Jan 08, 2012 4:37 pm
Posts: 474
Location: Southern Indiana
Thanks guys... I guess with me still trying to get the buggy together and you all saying the 4130 axles should be enough, I will save some cash for now and get the eBay deal... If I break one I will replace with a 300m... Going to order this afternoon unless someone changes my mind... Thanks for helping me... I am looking forward to getting past this part. I will put the build on hold till I get the axles... Then will weld the pipe in I need for reinforcement and work on the shock mounts... I will post pics showing my thoughts before I rip into it...


Top
 Profile  
 
 Post subject: Re: Rail Buggy Upgrade
PostPosted: Mon Oct 29, 2012 8:56 pm 
Offline

Joined: Sun Jan 08, 2012 4:37 pm
Posts: 474
Location: Southern Indiana
well each Chromo axle I was able to find that was my size or where they would cut them down for me are "Off Shores Axles" so I guess that means Chinease... you guys all say dont buy them cause they are crap... I wish it wasnt true so I could just move on but I dont want to take the chance if its the case... I would rather buy one 300m at a time than buy somethign that will cause me trouble later on.


My choices:
1. 300M Axle from Pacific Customs - ( can buy one of these right now and then another one after I pay back my CC)
http://www.pacificcustoms.com/mm5/merchant.mvc?Screen=PROD&Product_Code=AC525321-5&Store_Code=PC&search=axle+930&filter_cat=&PowerSearch_Begin_Only=&sort=&range_low=&range_high=

I am almost positive that these are sourced from KarTek!!

2. I have a guy on Ebay that will cut down some Chinese axles for me to what I need for 265.00...
His SIte:
http://www.tomprodesign.com/

He says he runs them on his buggies and has had no trouble... (he builds mini buggies with GSXR motors I think)

3. just keep looking for used or a better deal... but I dont think its out there... I can buy the off shore axles cheaper that that )190 or less for the set) but they would not be cut to what I need...

http://www.pacificcustoms.com/mm5/merchant.mvc?Screen=PROD&Product_Code=AC525222&Store_Code=PC&search=axle+930&filter_cat=&PowerSearch_Begin_Only=&sort=&range_low=&range_high=

Going to sleep on it and decide in the morning... to be honest I am leaning to the 300M only cause I know its not Chinease and most of you guys say its good stuff (even though it would be over kill, if I can ever get past this build I could keep it for other frames right)

thanks for helping... would be nice if I knew others near me that were doing the same thing... All I can do it take the advice of others and do the best I can...

:twisted:


Top
 Profile  
 
 Post subject: Re: Rail Buggy Upgrade
PostPosted: Mon Oct 29, 2012 10:39 pm 
Offline
WoodsBuggy Addict
User avatar

Joined: Mon Mar 16, 2009 12:37 am
Posts: 2737
Location: moulton,al
i would buy sway-a-way axles and call it a day, ive only ever seen one break and it was for bus joints, never heard of any for 930's give any trouble
my 2 cents 8)

_________________
Just Stand On It!!!!

Chris


Top
 Profile  
 
 Post subject: Re: Rail Buggy Upgrade
PostPosted: Mon Oct 29, 2012 10:51 pm 
Offline
User avatar

Joined: Sat Aug 23, 2008 5:42 pm
Posts: 612
Location: Ashland,Ky
I know a lot of people gripe about the empi axles. But that's all I've ever run and have never had a problem. I think it is in the empi c.v.'s and I am putting down over 200 HP to the wheels and have broke everything else but the axles. Just my 2 cents.
I also run the German lobro joints


Top
 Profile  
 
 Post subject: Re: Rail Buggy Upgrade
PostPosted: Tue Oct 30, 2012 7:00 am 
Offline

Joined: Sun Jan 08, 2012 4:37 pm
Posts: 474
Location: Southern Indiana
Thanks guys... making the order today...


Top
 Profile  
 
 Post subject: Re: Rail Buggy Upgrade
PostPosted: Fri Nov 02, 2012 2:48 pm 
Offline

Joined: Sun Jan 08, 2012 4:37 pm
Posts: 474
Location: Southern Indiana
Parts showed up today... I have a buddy that says I can borrow his welder Sunday so we will see how that goes... I will bolt up the axles later today and check the clearance and all... After this I will be able to get to work and cut some tubing.

Image

Image


More to follow tonight or tomorrow...


Top
 Profile  
 
 Post subject: Re: Rail Buggy Upgrade
PostPosted: Fri Nov 02, 2012 10:04 pm 
Offline

Joined: Sat Jan 27, 2007 12:38 am
Posts: 961
Location: Kettering Ohio
Now get to work! 8)

On the welder, remember to turn the gas on if it has gas. Don't be afraid to turn the heat up pretty high and run your wire speed a little low. It should sound like an egg frying. Nice even sizzle.

_________________
"Obstacles are those frightful things you see when you take your eyes off your goal." -Henry Ford


Top
 Profile  
 
 Post subject: Re: Rail Buggy Upgrade
PostPosted: Sat Nov 03, 2012 11:51 am 
Offline

Joined: Sun Jan 08, 2012 4:37 pm
Posts: 474
Location: Southern Indiana
Yeah, its been a while but I will run some beads on something first... its cold and rainy today... I will test fit the axle so I know I am in good shape and try to get some ideas for the upper mount (wish I had something to bend the tubing a bit)... then I hope tomorrow I can start cutting and welding... all depends on if he really lets me borrow his welder... he said yes, so I expect to get it sometime tomorrow... If not I will start looking for one to rent...but that will complicate things. Pic's coming later today...


Top
 Profile  
 
 Post subject: Re: Rail Buggy Upgrade
PostPosted: Sat Nov 03, 2012 6:12 pm 
Offline

Joined: Sun Jan 08, 2012 4:37 pm
Posts: 474
Location: Southern Indiana
OK new questions...

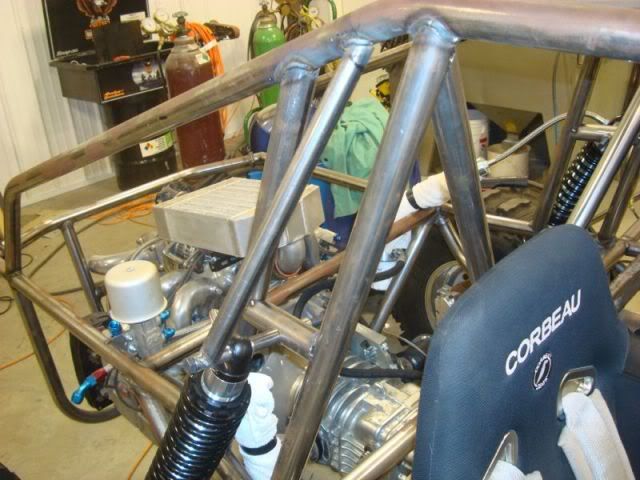
Fooling with the clocking (doing dry mock up for now with no clips on the axle). I have them on the buggy and I dropped one side to 22 deg...

1. With these being race prepped should I go more? Or just stick to 22 for longer life?

2. clocking... I followed the link below that I found on this site... However after reviewing what the guy said I bought the CV's from he puts them together the opposite way:
Site: http://www.outfrontmotorsports.com/cv_assembly.htm

Sellers remarks:
Quote
>>>> CV life also has a ton to do with axle angle too. You need to keep
>>>> it around 28 degrees to live a long life. 32 degrees is max and
>>>> shouldn't be run at such a high angle.

Quote
The chromolly cv cage has a thick side and a thinner side. It really doesn't matter what way you put it, but the thick side will give you a little more strength and the thin side will give you a little more freeness. I prefer to go with the freeness. The cv will go any direction as long as it's assembled right. Just put them all the same direction so they look good:).. Swepco 101 Moly Grease is what you need!

Not really sure what that means...

3. when I set it up if I use 22 Deg. at full droop should that be calculated after the limit straps have been installed? So in other words if I set the droop at 25 deg with shock at full extension and I adjust the limit strap to say 11.5 inches it should end up as 22 deg? (just as an example not sure of the numbers).. sounds like I should set them to about 28 at full droop and then after the straps are on adjust them up to less? I am searching this out now.

4. I have 12 inch fox 2.0 emulsion shocks... I know I need to set the limit straps less than full extension would a 1/2 inch be OK or 1 full inch? or more? I want to keep as much stroke as I can in the shock.


I have more questions but need to know the above first... I have not bought any limit straps or mounts for the straps yet... I thought I would get them after the shocks were bolted up...

let me know... I hope to pick up the welder tomorrow... if not I will be on hold.

Image

Image

Image

Image

Image


Top
 Profile  
 
 Post subject: Re: Rail Buggy Upgrade
PostPosted: Sat Nov 03, 2012 7:00 pm 
Offline

Joined: Sat Jan 27, 2007 12:38 am
Posts: 961
Location: Kettering Ohio
The angle on your CV is compound. Meaning it's not just the angle horizontally but your offset from the transaxle to the stub axle. Just because your CV can handle "x" amount of angle doesn't mean you can use it all because of the offset. With that said I think you'll be fine with 22 degrees. Spin the wheel with the axle installed and see if it binds or clicks. Remember too that limit straps will stretch some after they support the suspension over time. Give yourself enough adjustment to take up the stretch after you've driven it for a while.

_________________
"Obstacles are those frightful things you see when you take your eyes off your goal." -Henry Ford


Top
 Profile  
 
 Post subject: Re: Rail Buggy Upgrade
PostPosted: Sat Nov 03, 2012 7:07 pm 
Offline

Joined: Sun Jan 08, 2012 4:37 pm
Posts: 474
Location: Southern Indiana
So do you think I should set the max at 28 Deg. While having the shock at full extension and then use the limit strap to dial in 22 Deg? If so this may also give the shock some padding so it doesn't bottom when the tire leaves the ground.


Top
 Profile  
 
 Post subject: Re: Rail Buggy Upgrade
PostPosted: Sat Nov 03, 2012 7:25 pm 
Offline
WB Contributor
User avatar

Joined: Thu Sep 06, 2012 2:23 pm
Posts: 1212
Location: Chattanooga Tennessee
You need to find out where the CV starts to bind or pop then back it up an inch to an inch and one half an set that at full droop with your limit strap installed. This will give you the stretch for your limit strap and allow you to never bottom out your shock. If your budget allows get the clevis style strap mount for your upper with half of the threads showing so you can take up the stretch in the limit strap. You will just weld a bung through the frame to put the clevis treaded rod through. You will also want to set a bump stop at the top of your travel but you should set it where the bottom of your tire is 3/4" or so below your engine cage so it doesn't bottom the frame in the dirt.

_________________
Water Cooled Consortium, Chairman of the Build (Former AC purist)


Top
 Profile  
 
 Post subject: Re: Rail Buggy Upgrade
PostPosted: Sat Nov 03, 2012 7:33 pm 
Offline

Joined: Sun Jan 08, 2012 4:37 pm
Posts: 474
Location: Southern Indiana
OK so I understand... you want me to drop the axle till it binds... then lift it 1 - 1.5 inches. At this point this is where I mount the shock fully extended... then add the strap and bump stop ...

sound like a recording yet ;) ( I just want to be sure).

Should I at this point pack the axle with grease and add the clips tot eh axle? Or keep it dry while mocking it up?


Top
 Profile  
 
 Post subject: Re: Rail Buggy Upgrade
PostPosted: Sat Nov 03, 2012 7:35 pm 
Offline
Master fabricator
User avatar

Joined: Fri Mar 02, 2007 11:55 pm
Posts: 2304
Location: S.W. Pa. Wellsville Water Cooled Chapter
Keep rotating the axle while dropping it down the cv's are free turning then the stiffen up some.
Keep it dry until your finished

_________________
Of all the things I've lost, I miss my mind the most.
M
A
G
A


Top
 Profile  
 
 Post subject: Re: Rail Buggy Upgrade
PostPosted: Sat Nov 03, 2012 7:49 pm 
Offline

Joined: Sun Jan 08, 2012 4:37 pm
Posts: 474
Location: Southern Indiana
Should it be dry but have the clips on the axles? I ask because I know when I was turning it earlier it seemed like it would catch sometimes and I had to wiggle the axle to get it to keep turning... I have some things I need to run out for quick and I will mess with it in a few...


Top
 Profile  
 
 Post subject: Re: Rail Buggy Upgrade
PostPosted: Sat Nov 03, 2012 8:31 pm 
Offline
WB Contributor
User avatar

Joined: Thu Sep 06, 2012 2:23 pm
Posts: 1212
Location: Chattanooga Tennessee
Add a little spray lube to make sure the cv turns free. You should put clips/ spiral locks on. And like the previous post when it starts to bind then back it up like as I noted in my earlier post. Do it that way and you will never exceed you cv angle.

You got this man.

_________________
Water Cooled Consortium, Chairman of the Build (Former AC purist)


Top
 Profile  
 
 Post subject: Re: Rail Buggy Upgrade
PostPosted: Sun Nov 04, 2012 12:39 am 
Offline

Joined: Sun Jan 08, 2012 4:37 pm
Posts: 474
Location: Southern Indiana
OK... just had some time to look at the axles and check the droop...

On the cages should the wider side face the cup or the axle? I have them facing the axle... The rest looks like the site listed above for clocking.

For setting the droop I think I get it after reading a few times, you mean drop the arm down till the side to side movement is gone then lift it about an inch Right...

I saw Mikes Quote here:
First make the stub axles and drive flanges level with each other. There should be some lateral movement with the axle, somewhere around 3/16" to 1/4" this makes sure the axles are not too long, the lateral movement should be the same for each side. If one side has more than the other the trans is not centered, that should be corrected first. Start to lower the trailing arm while moving the axle back and forth, just as the lateral movement stops raise the trailing arm up one inch and set your limit straps that is max droop. Do the opposite moving the trailing arm up and set your bump stop. There might be some fine tuning needed is there is a bunch of clicking from the cv's at max droop, just shorten up the limit straps some.

I have the Axles on and clocked... just need to get this part sorted out... I pick up the welder tomorrow afternoon for sure.

One thing I notice is that it seems to catch sometimes while turning the axle, and it will do this no matter what the deg. is set at (0 or 20+ deg.) its just enough to catch my attention... is that normal? I did spray some wd40 in the CV while turning it... it doesn't flat stop it from turning, but its enough to feel it catch.

I will keep fooling with it tomorrow...


Top
 Profile  
 
 Post subject: Re: Rail Buggy Upgrade
PostPosted: Sun Nov 04, 2012 8:59 am 
Offline

Joined: Sat Jan 27, 2007 12:38 am
Posts: 961
Location: Kettering Ohio
Sometimes the CV's will bind a little without grease. You will notice a distinct clicking/clunking noise when you rotate the wheel if you've gone too far. The axle will also be tight side to side at that point. That's too much angle. Just back it off from there until it's all smooth and go a touch further for added insurance.

_________________
"Obstacles are those frightful things you see when you take your eyes off your goal." -Henry Ford


Top
 Profile  
 
 Post subject: Re: Rail Buggy Upgrade
PostPosted: Sun Nov 04, 2012 9:09 pm 
Offline

Joined: Sun Jan 08, 2012 4:37 pm
Posts: 474
Location: Southern Indiana
OK, so I wasted the whole day not working on the buggy :( but I did pick up my buddies welder I get it for a week or so...

Few things... I took some video for you guys so you can see what I see... also I have 2 questions...

1. Should I get the limit straps now and use them to set the max droop before I weld on the shock brackets?
2. Should I get the Bracket to weld to the outside of the frame for the clevis bolt or just drill a hole and insert a small tube and weld it into the frame?

This bracket:
http://www.pacificcustoms.com/mm5/merch ... ange_high=


This for the bottom:
http://www.pacificcustoms.com/mm5/merch ... ange_high=


0 Deg.
Image

10 Deg.
Image

15 Deg.
Image

20 Deg.
Image

25 Deg.
Image

30 (ran out of batteries) but this is the limit and the axle plunge is gone somewhere between 29-30 ish. At 30 it will not turn at all... but will start turning agn at about 28 Deg.


Top
 Profile  
 
 Post subject: Re: Rail Buggy Upgrade
PostPosted: Mon Nov 05, 2012 8:32 am 
Offline

Joined: Sun Jan 08, 2012 4:37 pm
Posts: 474
Location: Southern Indiana
reading this I am wondering if my axle has a compound angle... I am 3 inches back so the axle is not in perfect line with its self... could be why I am getting the clicking?? Don't know.. let me know what you guys think..

http://www.minibuggy.net/forum/driveline/7715-cheating-cv-angles-axles-front-back.html


Top
 Profile  
 
 Post subject: Re: Rail Buggy Upgrade
PostPosted: Mon Nov 05, 2012 8:39 am 
Offline

Joined: Sat Jan 27, 2007 12:38 am
Posts: 961
Location: Kettering Ohio
Yes your axles have a compound angle. They always will be unless the transmission is moved back to line up with the stub axles. That takes away from the max angle you can run.

fortydegnorth wrote:
The angle on your CV is compound. Meaning it's not just the angle horizontally but your offset from the transaxle to the stub axle. Just because your CV can handle "x" amount of angle doesn't mean you can use it all because of the offset. With that said I think you'll be fine with 22 degrees. Spin the wheel with the axle installed and see if it binds or clicks. Remember too that limit straps will stretch some after they support the suspension over time. Give yourself enough adjustment to take up the stretch after you've driven it for a while.

_________________
"Obstacles are those frightful things you see when you take your eyes off your goal." -Henry Ford


Top
 Profile  
 
 Post subject: Re: Rail Buggy Upgrade
PostPosted: Mon Nov 05, 2012 9:28 am 
Offline

Joined: Sun Jan 08, 2012 4:37 pm
Posts: 474
Location: Southern Indiana
thanks... I get it now... you still feel like 22 will be good for me? I will set each one to 22 later today (working from home today) and see... if I set it at 22 and it catches at all should I back it off till there is no catch or just set it at 22 and tweak it with the limit strap later on? Did you check out the video I listed above? right at 20 is where it will start to catch...


Top
 Profile  
 
 Post subject: Re: Rail Buggy Upgrade
PostPosted: Mon Nov 05, 2012 11:56 am 
Offline
WB Contributor
User avatar

Joined: Thu Sep 06, 2012 2:23 pm
Posts: 1212
Location: Chattanooga Tennessee
You can move your trans and engine back an inch and gain a little more angle. Just be sure to check your axle length to make sure that it doesn't make your axles to long.

I would set your shock at bottom at your 22 degree angle you will want your limit strap to be an inch short of the shock bottoming out. you can drill your frame and use a piece of tube that fits a 1/2" bolt and weld it on both sides for mounting your clevis or use the mount from pacific customs. The lower mount can be two tabs welded side by side to keep it in double shear.

Limit straps Quads will stretch about a 1/8" per inch of strap. That is why I suggest the clevis. My straps were used from my previous car and were thus pre-streched so I did't run a clevis, wish I did.

_________________
Water Cooled Consortium, Chairman of the Build (Former AC purist)


Top
 Profile  
 
 Post subject: Re: Rail Buggy Upgrade
PostPosted: Mon Nov 05, 2012 12:17 pm 
Offline

Joined: Sun Jan 08, 2012 4:37 pm
Posts: 474
Location: Southern Indiana
Thanks Red.... I cant move the eng. and trans easily as I have a whole upper mount for the trans (see pic). I may be stuck for now...

I want to ask one last time ;) (I know I am sorry)... need to be really sure so I am not wasting resources.

My Plan:
Drop arm to where the angle meter shows 22 Deg. At this point weld on the shock mounts and mount shock at full extension. add the limit strap and clevis, and take another inch out to account for the shock.

Also need to weld in some tubing that goes from the top of the torsion tube tot he frame and from the end of the trans tube to the frame to tie that back together.

Upper shock mount plan... Please let me know if this is a good idea....

I could keep the frame as is... and add some extra tubing to make up the upper shock mount....
Image

Or I could cut out that slanted tube I have (see here) and go with a setup like you see below??
Image
and
Image

I plan to start cutting the tubing tonight and weld as early as tomorrow, just need to get the whole setting the axle idea set in stone... thanks for helping me...

I hate being a newb...


Top
 Profile  
 
Display posts from previous:  Sort by  
Post new topic Reply to topic  [ 455 posts ]  Go to page Previous  1, 2, 3, 4, 5, 6, 7 ... 19  Next

Board index » General » Buggy Builds

All times are UTC - 5 hours [ DST ]


Who is online

Users browsing this forum: No registered users and 1 guest


You cannot post new topics in this forum
You cannot reply to topics in this forum
You cannot edit your posts in this forum
You cannot delete your posts in this forum
You cannot post attachments in this forum

Search for:
Jump to:  
Powered by phpBB® Forum Software © phpBB Group