It is currently Sun May 03, 2026 5:01 am

Board index » General » Buggy Builds

All times are UTC - 5 hours [ DST ]


Post new topic Reply to topic  [ 455 posts ]  Go to page Previous  1, 2, 3, 4, 5 ... 19  Next
Author Message
 Post subject: Re: Rail Buggy Upgrade
PostPosted: Wed Sep 12, 2012 8:35 pm 
Offline

Joined: Sat Jan 27, 2007 12:38 am
Posts: 961
Location: Kettering Ohio
for finish grinding the areas you cut off try and 4.5" sanding disk. It's layers of heavy grit sandpaper for your grinder. as far as cutting goes, you can use your cutoff wheels to cut the tube too. Just do some trial and error. A paper towel roll will get you close to how you need to notch the tube and you can cut it with scissors.

_________________
"Obstacles are those frightful things you see when you take your eyes off your goal." -Henry Ford


Top
 Profile  
 
 Post subject: Re: Rail Buggy Upgrade
PostPosted: Wed Sep 12, 2012 9:17 pm 
Offline

Joined: Sun Jan 08, 2012 4:37 pm
Posts: 474
Location: Southern Indiana
I have some flap sanding disks I may give it a once over after I get the other side done... What shows the most is the surface.... It's somewhat smooth where I cleaned up but the factory finish is a bit textured, like a hammered Finnish. I will work on it for a bit... Nothing else I can do till the bushings show up.... Thanks for helping me... I will post more after I get the other side done.


Top
 Profile  
 
 Post subject: Re: Rail Buggy Upgrade
PostPosted: Fri Sep 14, 2012 8:00 pm 
Offline

Joined: Sun Jan 08, 2012 4:37 pm
Posts: 474
Location: Southern Indiana
Well I did a little more grinding, and cut the two short pips off... Looking better, and I will still work to smooth it out more. I am ready for the pipe and still need the bushings for the arms so I can mock it all up... I bought some back rims to tide me over till I find what I want... just need to get it all together now...

Few pics... Will add more when I have the bushings or the pipe cut up....

Image

Image

Image

Image


Top
 Profile  
 
 Post subject: Re: Rail Buggy Upgrade
PostPosted: Wed Oct 17, 2012 7:34 pm 
Offline

Joined: Sun Jan 08, 2012 4:37 pm
Posts: 474
Location: Southern Indiana
Ok guys... Been working on my shift rod... Finding problems along the way... Question. How the heck am I going to mount my coil over shocks? The arms are easy... Problem is the coil over shock body hits the side of the frame.... This stuff is starting to get me down...


Image

Image

Image

Image


Top
 Profile  
 
 Post subject: Re: Rail Buggy Upgrade
PostPosted: Wed Oct 17, 2012 8:00 pm 
Offline
WB Contributor
User avatar

Joined: Fri Sep 05, 2008 11:22 am
Posts: 1177
Location: Wellsville, Ohio
Going to havta bring a tube out off the main rear down tube and main rear hoop to where the shock wants to be, Lots of different ways that could be accomplished, Or Look at moving the shock inside the frame rail if thats even an option. Easiest in my opionion, Get some 1/4" round bar, Bend it to where you would like your actual mount to be, Even tack weld it in place if needed, then figure if you need any other pieces bent, if so Do it with the round bar. Then when you figure out the pieces you need, Take your round bar some where and have them bend it up. Just be sure to know wether you want it to be Inside or outside radious. Make any sense? lol

_________________
"IT IS WHAT IT IS"


Top
 Profile  
 
 Post subject: Re: Rail Buggy Upgrade
PostPosted: Wed Oct 17, 2012 8:01 pm 
Offline
User avatar

Joined: Sat Mar 31, 2007 4:24 pm
Posts: 774
Location: Okeana, Ohio
Can do something similar...
Image

_________________
A broken clock is right two times a day.


Top
 Profile  
 
 Post subject: Re: Rail Buggy Upgrade
PostPosted: Wed Oct 17, 2012 8:04 pm 
Offline
WB Contributor

Joined: Mon Apr 28, 2008 1:49 pm
Posts: 1107
Location: cinti,oh
mine did the same thing. i used a spacer with a longer bolt to get the shock spring away from the frame. or another way is to weld a heavy duty piece of pipe to the frame pointing outward, basically making your own spacer. dont let anything you do get you down, look at it all as a learning experience :) one day youll be able to help someone with the same problemheres a pic of how i did my shift box to raise itImage Image
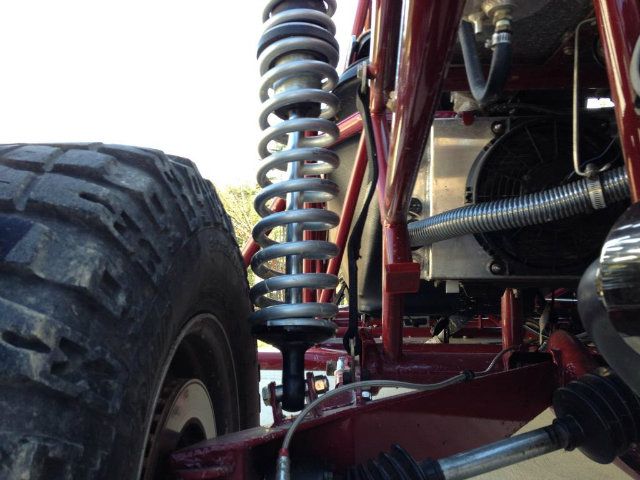
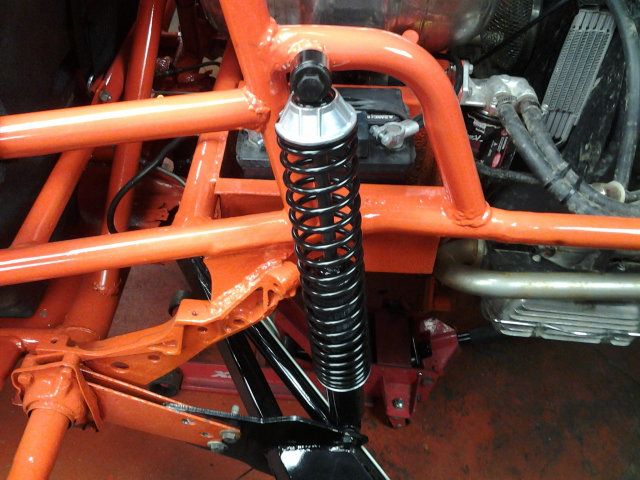
heres apic of shock not how it is now.. but there is a 2 inch spacer between the shoc and mount at top, and i also moved the shock outside on the bottom with a shock mount tab that i welded on..... hope that helps or gives you an idea

_________________
ANTI- antifreeze!!!!!!


Top
 Profile  
 
 Post subject: Re: Rail Buggy Upgrade
PostPosted: Wed Oct 17, 2012 8:06 pm 
Offline

Joined: Sun Jan 08, 2012 4:37 pm
Posts: 474
Location: Southern Indiana
I see what you mean... I am going to get the shock back out and take another look.. It's pretty far out... Not sure.


Top
 Profile  
 
 Post subject: Re: Rail Buggy Upgrade
PostPosted: Wed Oct 17, 2012 8:15 pm 
Offline
User avatar

Joined: Sat Mar 31, 2007 4:24 pm
Posts: 774
Location: Okeana, Ohio
Be sure to have your wheel in place before you mount the shock, you don't want any problems with the shock hitting the wheel/tire. Also, the shock should be at about 90 degrees to your trailing arm at full compression.

_________________
A broken clock is right two times a day.


Top
 Profile  
 
 Post subject: Re: Rail Buggy Upgrade
PostPosted: Wed Oct 17, 2012 8:17 pm 
Offline
WB Contributor
User avatar

Joined: Thu Sep 06, 2012 2:23 pm
Posts: 1212
Location: Chattanooga Tennessee
Image
Image
Image
Image
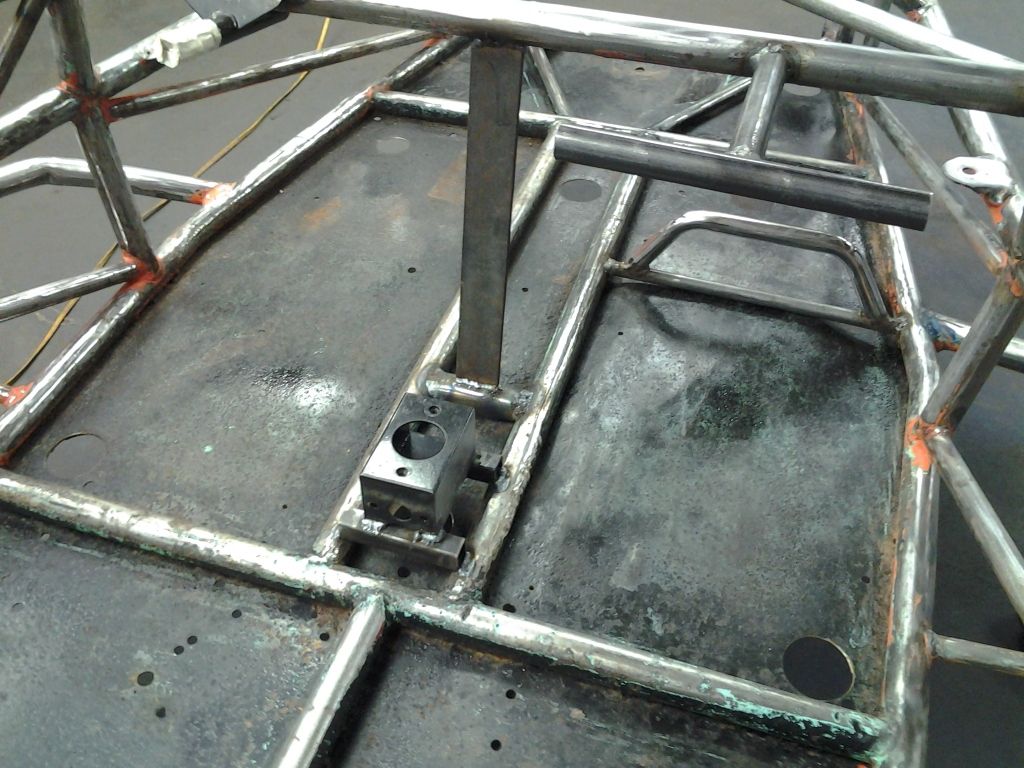
Make sure the top and bottom mounts are in duel shear, a mount on each side of the rod end
I have attached a few photo's of my shock mounts as it looks like you are using fox 2.5 shocks

_________________
Water Cooled Consortium, Chairman of the Build (Former AC purist)


Top
 Profile  
 
 Post subject: Re: Rail Buggy Upgrade
PostPosted: Wed Oct 17, 2012 8:24 pm 
Offline

Joined: Sat Jan 27, 2007 12:38 am
Posts: 961
Location: Kettering Ohio
Myrddin, where are you in Indiana again? I know you told me once but I don't think I saved the message and I don't remember. Do you have a trailer? Looks like a day would wrap up a lot of your projects if you could get the buggy and some material to someone's place. I'd consider helping you out of the timing was right and I wasn't too far away. I'm in Kettering near Dayton Ohio.

_________________
"Obstacles are those frightful things you see when you take your eyes off your goal." -Henry Ford


Top
 Profile  
 
 Post subject: Re: Rail Buggy Upgrade
PostPosted: Wed Oct 17, 2012 8:46 pm 
Offline

Joined: Sun Jan 08, 2012 4:37 pm
Posts: 474
Location: Southern Indiana
Sellersburg near the bass pro shop... I am trying to see what sort of space it needs to clear the frame looks like about 7 inches out... I have backed myself into an odd spot... I am unsure how I would get it into a trailer at this point... I have 14 foot of 120 wall Dom tubing... I do have the bottom shock mounts that came with the arms (there dual shock mounts) but nothing at all for the top... I am out next week for work but after I think I will take a few days off and get this situated somehow... you guys are all really cool to help out... wish I were closer to to you... let me know what you think I am going to see what sort of mount ideas I can come up with... I know the shock has to be mounted so it doesn't swing when the arms move... so I need to find that spot as well. I do have the FOX 2.5's they are 12 inch shocks...

I may take off tomorrow as well so I can get an idea as to what I need to do... I will post my thought tomorrow...

Thanks for the pics... They help me to see what it needs....

don't be surprised if I am in your driveway in the morning :)

I wish...


Top
 Profile  
 
 Post subject: Re: Rail Buggy Upgrade
PostPosted: Wed Oct 17, 2012 10:07 pm 
Offline

Joined: Sat Jan 27, 2007 12:38 am
Posts: 961
Location: Kettering Ohio
The mount doesn't need to be anything all bent up and elaborate. I'd focus on double shear and try to get the angle of the shock as close to perpendicular to the trailing arm as possible at full bump/compression. Something simple like the pic below would probably work.

Image

_________________
"Obstacles are those frightful things you see when you take your eyes off your goal." -Henry Ford


Top
 Profile  
 
 Post subject: Re: Rail Buggy Upgrade
PostPosted: Wed Oct 17, 2012 10:24 pm 
Offline
WB Contributor
User avatar

Joined: Thu Sep 06, 2012 2:23 pm
Posts: 1212
Location: Chattanooga Tennessee
I agree with fortydegnorth make sure you have double shear and keep it simple.

_________________
Water Cooled Consortium, Chairman of the Build (Former AC purist)


Top
 Profile  
 
 Post subject: Re: Rail Buggy Upgrade
PostPosted: Thu Oct 18, 2012 10:03 am 
Offline

Joined: Sun Jan 08, 2012 4:37 pm
Posts: 474
Location: Southern Indiana
Thanks guys... These pics have helped me a lot... I should be able to get some smaller pipe at the tractor supply down the road.... Just need to come up with something that will work. To get these shocks to compress do I let the air out? When you say full bump you mean the arm is up as far as it can go right... Also when you say perpendicular do you mean at full bump the shock should be vertical with no slant in or our or side to side? Do I need axles in to do this? I have the 930 cvs but have not figured out the length of axle yet. I talked to someone at work who says I can borrow his welded next weekend (week from Saturday) so things may be looking up... Looking forward to getting past this part.


Top
 Profile  
 
 Post subject: Re: Rail Buggy Upgrade
PostPosted: Thu Oct 18, 2012 10:18 am 
Offline

Joined: Sat Jan 27, 2007 12:38 am
Posts: 961
Location: Kettering Ohio
Full bump is compressed. No need to let the nitrogen out of the shock. Your CV's will dictate how much travel you can get from the arm. If you have axles and cv's installed, with an angle finder, it would help a lot. You first need to find full droop, or the lowest the arm will travel in relation to your cv angle. I'd cushion it a little and make the shock compressed 1/2"-1" at fool droop so it isn't bottomed out. Then you find full compressed height on the arm with the axle and angle finder again. This will be full bump. The distance at the point you choose to mount the shock on the trailing arm will be your shock travel. Just make sure the distance isn't more than 12", if that is what the shocks are.

A good page concerning CV's:
http://blindchickenracing.com/How_to/CV ... ts_101.htm

Remember that the angle isn't just up and down between the drive flange on the transaxle and the stub axle in your trailing arm. You should also account for the amount of setback angle from the drive flange to the stub axle. That is, the amount of angle that the trailing arm is behind the transaxle (or in front depending on position). 930 cv's are usually good to 25 degrees angle but I'd go conservative on that especially if your setback angle is high. Obviously the further down the arm (away from the frame) you go the longer the travel of the shock will be. At full bump, compression, try to angle the shock so it's close to perpendicular to the trailing arm. Some well placed pieces of tape, strung from one tube to another, can really help to mark the appropriate mounting location. Take your time and mess with it a to get it where you want it.

_________________
"Obstacles are those frightful things you see when you take your eyes off your goal." -Henry Ford


Top
 Profile  
 
 Post subject: Re: Rail Buggy Upgrade
PostPosted: Thu Oct 18, 2012 2:47 pm 
Offline

Joined: Sun Jan 08, 2012 4:37 pm
Posts: 474
Location: Southern Indiana
OK so I have this straight.

1. I should go ahead and assemble my arms so I can put the rims on that I will be using this will be so I know the rim/tire will not hit the shock mount or body (right?)

2. With the arm fully assembled and rim on I should then also have the axle I need in so I know where full droop and max bump are (I do have the angle finder already but no axle). I guess to measure for my axle I need the arms assembled and even with the drive flange so I can measure from flange to stub and subtract a 1/4... this is what I was told from the guy who sold me the race prepped 930 cv's... was told these cv's would do more than 25 but I was planning on 22?
his comment:
CV life also has a ton to do with axle angle too. You need to keep it around 28 degrees to live a long life. 32 degrees is max and shouldn't be run at such a high angle.


3. Once I have the droop and bump figured out I can then weld the shock mount to the arm... and then after that I should be able to figure out where the upper shock mount will need to be and I can add tube and brackets to get it there... Also will add a limit strap and a bumpstop I guess?? And I think I need to trim the bracket on the torsion tube for the arm so it can lift up higher, right now the arm hits the bracket its bolted to and that is what stops it.

I have a few diagrams of how I could get the upper shock mount fabbed up but before I show you guys that it sounds like I have a lot more work to go to get there...


any changes to my plans, thanks agn for helping.


Top
 Profile  
 
 Post subject: Re: Rail Buggy Upgrade
PostPosted: Thu Oct 18, 2012 3:06 pm 
Offline

Joined: Sat Jan 27, 2007 12:38 am
Posts: 961
Location: Kettering Ohio
Sounds like you have a grasp on it now. No reason to make shock mounts if you don't know where they go. Definitely get as much installed as you can so you can check interference. Sometimes the "full bump" will be before the cv angle maxes out because the frame will be sitting on the ground. Leave yourself a few inches under the frame so you aren't slamming into the ground if you decide to get enough air to bottom it out. Those shocks set up correctly should keep you from bottoming out too bad anyway. Bump stops and limit straps are a great idea. Might as well do it all at once since you have it apart. The cv's you have are probably race prepped, which allows for more angle. I wouldn't be too afraid to go up to 24-25 degrees with race prepped.

_________________
"Obstacles are those frightful things you see when you take your eyes off your goal." -Henry Ford


Top
 Profile  
 
 Post subject: Re: Rail Buggy Upgrade
PostPosted: Thu Oct 18, 2012 6:59 pm 
Offline

Joined: Sun Jan 08, 2012 4:37 pm
Posts: 474
Location: Southern Indiana
thanks man... my next thing will be to build out the arms and get the rims bolted up then... once its all together I will measure the space for the axle (will post pics at that point as I would hate to order the wrong length)... then at that point it sounds like I would be ready to fit the shocks... plus if I was really stuck at that point I could get it on a trailer as well

hint hint :)

sounds like I have an idea what to do next at least... I need to get the arms together and mounted so I can measure for the axle... I don't think I have enough to get them yet... looking at sway away... guessing it will be about 20 inches... we will see.

thanks for taking the time to help me out... I want it done right... but that makes it aggravating due to lack of tools and time...

I will post pics when the arms are built and I am trying to measure for the axle...


Top
 Profile  
 
 Post subject: Re: Rail Buggy Upgrade
PostPosted: Thu Oct 18, 2012 7:44 pm 
Offline

Joined: Sat Jan 27, 2007 12:38 am
Posts: 961
Location: Kettering Ohio
Typically a 3x3 arm will use a 19 1/4" axle.

http://www.blindchickenracing.com/How_t ... es_101.htm

Of course you are still better off setting everything up and measuring from cup to cup and subtracting 1/4". I used to have a 110 volt welder that would have been perfect for you. All of our welders are 220 now so I can't pack one up. Craigslist always has a list of welders for sale around here. You may check that if you are looking for a decent used setup. I prefer using gas but flux core will work for random projects just fine.

Drew's Offroad is just outside of Cincinnati if you ever want to hit up a buggy shop. They are pretty well stocked and Brian Drew is very knowledgeable and very willing to help. I'd guess it's about 2 hours from you. They could get you any part you want for sure. Just a guess, but I bet since you're in Indiana and he's in Ohio, if you have it shipped there won't be tax either. 8)

_________________
"Obstacles are those frightful things you see when you take your eyes off your goal." -Henry Ford


Top
 Profile  
 
 Post subject: Re: Rail Buggy Upgrade
PostPosted: Thu Oct 18, 2012 10:13 pm 
Offline

Joined: Sun Jan 08, 2012 4:37 pm
Posts: 474
Location: Southern Indiana
Thanks man... your real cool... I had some time on my hands so I built the arms... had to press the bearing in had trouble with the clips on each side only about 60% of the clip would go in... once I am able to torque the stub axle on it may take care of its self... one thing about the arms I have is that they are adjustable with the hymens joint and yes I have to pull the whole arm each time I need to adjust it... will deal with that later as I would still need to break it all down for paint and such. I don't want to measure till I can torque the stub axle on just so I know its seated as it should be. I will be out all week for work so I am unable to fool with the tires till next weekend, after that I can torque the stub (nothing to hold onto right now) then I will measure and post my pics... I think it was from inner cup to inner cup right?

If I can ever get this thing t run, I would love to meet up with you guys some time and shake your hand for your time... pics will come when I have the tire on and am measuring... have a nice weekend guys...


Top
 Profile  
 
 Post subject: Re: Rail Buggy Upgrade
PostPosted: Thu Oct 18, 2012 10:19 pm 
Offline

Joined: Sat Jan 27, 2007 12:38 am
Posts: 961
Location: Kettering Ohio
Yes, measure from the middle of cup to cup. That is where the end of the axle rides and it accounts for the plunge of the axle and CV. I don't mind sharing the little I know. A lot of people on here know a lot more but I think anyone would help. You'll be a pro in another year.

_________________
"Obstacles are those frightful things you see when you take your eyes off your goal." -Henry Ford


Top
 Profile  
 
 Post subject: Re: Rail Buggy Upgrade
PostPosted: Fri Oct 19, 2012 2:55 pm 
Offline

Joined: Sun Jan 08, 2012 4:37 pm
Posts: 474
Location: Southern Indiana
guys I am on my way out the door but I wanted to say I had another set back... I decided to check the clips in the arms that hold the bearing in (even though there pressed in) and I think they are too fat to seat right... how should I go about making them a tad skinner? machine shop or sandpaper? not sure what else to do here... I will not be able to fool with them till next Thur, I will need to pull the other 3 off as well.

Image

Image

Image

Image

as you can see (well if you can tell) the ears with the holes will sit inside the seat but the rest more or less sits ontop.

thanks guys

Image

Image

Image

Image


Top
 Profile  
 
 Post subject: Re: Rail Buggy Upgrade
PostPosted: Fri Oct 19, 2012 4:09 pm 
Offline

Joined: Sat Jan 27, 2007 12:38 am
Posts: 961
Location: Kettering Ohio
I've had to tap on snap rings before with a drift and hammer before to get them to pop into the groove. Have you tried to dry fit the ring without the bearings in? At least you'd know that the ring fit the groove. I had to mess with a big snap ring to clock my turbine housing on the turbo and it was a nightmare to get seated in the groove.

_________________
"Obstacles are those frightful things you see when you take your eyes off your goal." -Henry Ford


Top
 Profile  
 
 Post subject: Re: Rail Buggy Upgrade
PostPosted: Fri Oct 19, 2012 4:42 pm 
Offline

Joined: Sun Jan 08, 2012 4:37 pm
Posts: 474
Location: Southern Indiana
Well I had to use my pulley puller to rig up a press... I dont think I will be able to get the bearings out... And no I made the mistake of thinking they would fit so no dry fit. I did try to tap on them with a hammer and screwdriver and it seemed to seat the skinny side better but not much of a change on the fat side. I could try to press the bearangs in farther, but I dont think that's it as they are all exactly the same as far as the fit of the clip. I can try to sand them... But it will be quite hard I think... They should have fit... But they dont. I may be hung up for a while sanding them I guess...


Top
 Profile  
 
Display posts from previous:  Sort by  
Post new topic Reply to topic  [ 455 posts ]  Go to page Previous  1, 2, 3, 4, 5 ... 19  Next

Board index » General » Buggy Builds

All times are UTC - 5 hours [ DST ]


Who is online

Users browsing this forum: No registered users and 2 guests


You cannot post new topics in this forum
You cannot reply to topics in this forum
You cannot edit your posts in this forum
You cannot delete your posts in this forum
You cannot post attachments in this forum

Search for:
Jump to:  
Powered by phpBB® Forum Software © phpBB Group