It is currently Sun May 03, 2026 12:27 pm

Board index » General » Buggy Builds

All times are UTC - 5 hours [ DST ]


Post new topic Reply to topic  [ 455 posts ]  Go to page Previous  1 ... 9, 10, 11, 12, 13, 14, 15 ... 19  Next
Author Message
 Post subject: Re: Rail Buggy Upgrade
PostPosted: Sun Dec 09, 2012 10:04 pm 
Offline

Joined: Sun Jan 08, 2012 4:37 pm
Posts: 474
Location: Southern Indiana
I will chk the seats tomorrow but I don't think it's anywhere near the seat... Just wasn't sure what to do.


Top
 Profile  
 
 Post subject: Re: Rail Buggy Upgrade
PostPosted: Sun Dec 09, 2012 10:11 pm 
Offline
WB Contributor
User avatar

Joined: Thu Sep 06, 2012 2:23 pm
Posts: 1212
Location: Chattanooga Tennessee
Just don't want you to get knocked out in a roll over. I just like the direction you are taking it looks angry.

_________________
Water Cooled Consortium, Chairman of the Build (Former AC purist)


Top
 Profile  
 
 Post subject: Re: Rail Buggy Upgrade
PostPosted: Sun Dec 09, 2012 10:35 pm 
Offline
WB Contributor

Joined: Mon Apr 28, 2008 1:49 pm
Posts: 1107
Location: cinti,oh
ImageImage 
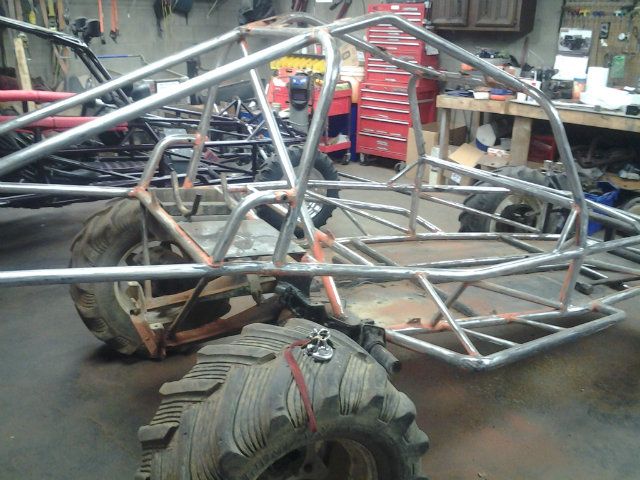
mine was similiar but the one bar was allready in it, so i just finished the x.might consider that as an option as well? run one long across, then two shorts two make the x... either way you definately want it braced.

_________________
ANTI- antifreeze!!!!!!


Top
 Profile  
 
 Post subject: Re: Rail Buggy Upgrade
PostPosted: Mon Dec 10, 2012 8:00 am 
Offline

Joined: Sun Jan 08, 2012 4:37 pm
Posts: 474
Location: Southern Indiana
Thanks Dave... That helps... Any reason why you didn't run the tube all the way out to the end of the tube... I guess it doesn't matter... But yeah you have what I was planning one long tube with two short ones on both sides to complete the X. I hope to get the first in later tonight or tomorrow for sure...

thanks Guys for your help...


Top
 Profile  
 
 Post subject: Re: Rail Buggy Upgrade
PostPosted: Mon Dec 10, 2012 4:23 pm 
Offline
WB Contributor
User avatar

Joined: Thu Sep 06, 2012 2:23 pm
Posts: 1212
Location: Chattanooga Tennessee
Diamond Dave did a great job on his project and he tests it regularly with some hard driving, mixed with a loose nut behind the wheel. Just don't night ride with him if he has been sipping the good stuff or he might forget that he left you at Dirty Turtle.

Just poking some fun Dave, we love you man. :mrgreen: :twisted: :mrgreen:

_________________
Water Cooled Consortium, Chairman of the Build (Former AC purist)


Top
 Profile  
 
 Post subject: Re: Rail Buggy Upgrade
PostPosted: Mon Dec 10, 2012 9:48 pm 
Offline

Joined: Sun Jan 08, 2012 4:37 pm
Posts: 474
Location: Southern Indiana
OK so I hit a pretty big snag... I wish I had seen this before cutting up my tubing.... Any way that whole hitting head thing... I don't know how I can ever run the X brace without that happening.... The seats are leaning right past the post... see the pics below, let me know your thoughts...

I even cut out the square bar to try and move things around... No Good...

With seats in it you can see it sits back by that hoop...
Image

started out OK:
Image

Then I was like ah man...
Image

Yup No Good...
Image

So what can I do if anything? I feel sorta screwed on this one... I could lift the seats and try to get them farther forward... but I think if I do that my head would be close to the roof (need to look at that before I rule it out). bummed out... want to get past all this.


Top
 Profile  
 
 Post subject: Re: Rail Buggy Upgrade
PostPosted: Mon Dec 10, 2012 9:54 pm 
Offline
WB Contributor
User avatar

Joined: Thu Sep 06, 2012 2:23 pm
Posts: 1212
Location: Chattanooga Tennessee
All is not lost, stop and watch the video I just posted laugh, then look at tying your x brace to the existing horizontal so it clears the old noggin. then brace to the torsion from the horizontal. :mrgreen: :mrgreen:

_________________
Water Cooled Consortium, Chairman of the Build (Former AC purist)


Top
 Profile  
 
 Post subject: Re: Rail Buggy Upgrade
PostPosted: Mon Dec 10, 2012 10:26 pm 
Offline

Joined: Sun Jan 08, 2012 4:37 pm
Posts: 474
Location: Southern Indiana
I don't think that will work, but I will check it out... Problem is the seats are close to that hoop corner... If I lift the seat it puts my head like a half inch from the roof. Plus my Gas tank sits on that rear bar... I am not sure how this will turn out. I am still thinking....


Top
 Profile  
 
 Post subject: Re: Rail Buggy Upgrade
PostPosted: Mon Dec 10, 2012 10:31 pm 
Offline
WB Contributor
User avatar

Joined: Thu Sep 06, 2012 2:23 pm
Posts: 1212
Location: Chattanooga Tennessee
Well I am glad you checked before you welded it all up. What seats are you using?

_________________
Water Cooled Consortium, Chairman of the Build (Former AC purist)


Top
 Profile  
 
 Post subject: Re: Rail Buggy Upgrade
PostPosted: Mon Dec 10, 2012 10:46 pm 
Offline

Joined: Sun Jan 08, 2012 4:37 pm
Posts: 474
Location: Southern Indiana
I forget what brand they are... Same you see in those pics... I need to figure this out... I may be able to sacrifice some headroom to squeeze by... But even then that tube will be really close to both passengers heads. I am looking for ideas now... But it looks bad so far. I want to mess with the head room a bit more b4 I give in... How many inches should allow for head room and how close is ok for the X brace to be near the head area


Top
 Profile  
 
 Post subject: Re: Rail Buggy Upgrade
PostPosted: Mon Dec 10, 2012 11:09 pm 
Offline
WB Contributor
User avatar

Joined: Thu Sep 06, 2012 2:23 pm
Posts: 1212
Location: Chattanooga Tennessee
See what you can do with making the brace tie in to the midline like Forty, I know it is not ideal. You can also look at using 1" tube to get more clearance, still strong but smaller OD. :mrgreen: :mrgreen:

_________________
Water Cooled Consortium, Chairman of the Build (Former AC purist)


Top
 Profile  
 
 Post subject: Re: Rail Buggy Upgrade
PostPosted: Tue Dec 11, 2012 8:29 am 
Offline

Joined: Sun Jan 08, 2012 4:37 pm
Posts: 474
Location: Southern Indiana
I took a look this morning... and if I run it back to the cross bar my gas tank sits on it might buy me the room I need to get past this... I need to cut out the half X I welded in last night and cut some more tube to fit... I will have to clean up the weld before I can do anything... I did actually weld in the one tube... I didn't think it would be in the way... At least I didn't weld it all up and then look. The X brace would end up on the back side of the Hoop if I do it this way... is that OK? After I get this worked out do I need to add another length of tube behind the seats for back support or no? Before the square tube was what the seats backed up to (I cut it out to try to get the X brace to fit).

Forty... looks like I follow your lead anyway ;) I wish this frame was a little bigger... its a small frame.... length is good (100+) but width is not so good.... and they chose to tilt the floor under the seat for head room instead of lifting the hoop... All good... as long as I can get it to come together... If I really get into it.... I want a 4 seater so the family can ride along too...


thank you for helping me... let me know what you think...


Top
 Profile  
 
 Post subject: Re: Rail Buggy Upgrade
PostPosted: Tue Dec 11, 2012 9:12 am 
Offline

Joined: Sat Jan 27, 2007 12:38 am
Posts: 961
Location: Kettering Ohio
Not that I am recommending this in any way. I feel safety is very important, especially when you are off road on steep inclines and conditions you can't always control. With that said, buggies have been built for years without an X brace behind the seats. The frames are quite strong in "factory" form. You have to ask yourself how hard you are going to drive it, and be honest. If you have plans to cruise down a main trail loop at just above idle, you are likely fine without the bracing. Your frame would probably withstand a pretty solid rollover without collapsing the roof. If you want to climb hills, run hard and fast or just get a little crazy, you need to make the X brace fit. Below is a pic of "plumberbill" when he flipped and smashed his roof pretty much flat. Of course it was the front of his roof and not the back. The back actually held up pretty well and had no X brace. If you plan to street drive and putt around then you can make that call. If you buy a buggy from Berrien, Beeline or some of the other manufacturers they don't have an X brace. I've never even seen it as an option except for the special built frames for hillclimbing and hardcore riding.

I have two X braces and I drive on the street mostly. I also know that I can make bad decisions sometimes that cause the stupid side of my brain to become active. I'd rather walk away with a bruise or two than a broken neck. Just my $.02

Image

_________________
"Obstacles are those frightful things you see when you take your eyes off your goal." -Henry Ford


Top
 Profile  
 
 Post subject: Re: Rail Buggy Upgrade
PostPosted: Tue Dec 11, 2012 9:45 am 
Offline
User avatar

Joined: Tue Jan 18, 2011 9:03 pm
Posts: 121
Location: Proctorville ohio
I've seen that pic before.. What was the deal? Hard flip or thin wall pipe or just not built well?

_________________
What do you mean your in limp mode?


Top
 Profile  
 
 Post subject: Re: Rail Buggy Upgrade
PostPosted: Tue Dec 11, 2012 10:57 am 
Offline

Joined: Sat Jan 27, 2007 12:38 am
Posts: 961
Location: Kettering Ohio
Here is the thread:

http://www.woodsbuggy.com/index.php?opt ... rbill+roof

_________________
"Obstacles are those frightful things you see when you take your eyes off your goal." -Henry Ford


Top
 Profile  
 
 Post subject: Re: Rail Buggy Upgrade
PostPosted: Tue Dec 11, 2012 11:20 am 
Offline

Joined: Sun Jan 08, 2012 4:37 pm
Posts: 474
Location: Southern Indiana
Forty... I want to be safe... Plan is trail ride only for now... But no hill climbing... That being said I dont know for sure that I wouldn't try... Do you think I should keep trying to fit the X brace... If so 2 questions... Should I make it work with it as is and keep it on top of the torsion tube or gain a inch or two by running to the cross bar right behind the hoop? In all honesty I just want it safe for my kids to be able to tag along and me not worry about something bad happening. Best I can tell is my head will be like 2 inches from the bar if I add it... If I keep as is I would need to lift the seats and that puts me about 2 inches from the roof...


Top
 Profile  
 
 Post subject: Re: Rail Buggy Upgrade
PostPosted: Tue Dec 11, 2012 1:07 pm 
Offline
Master fabricator
User avatar

Joined: Fri Mar 02, 2007 11:55 pm
Posts: 2304
Location: S.W. Pa. Wellsville Water Cooled Chapter
First I don't think it's wise to have folks plan how to build something on how they "intend" to use it. Their original intention might have been to do some light trail riding and some street use and "no hill climbing" until they see what this crazy thing can do. The more they do in it the smaller their brains get and the bigger their balls get.

When I started to build my first car I had my ideas on how I wanted to build things based on my racing background. I started the construction, back when dune-buggy . com was going strong, before this site was even thought of. I hooked up with Roy and his crew at Wellsville one year and he took me for a ride. Lets just say when he was finished with me I went home (changed my underwear) and tore apart almost everything I had put together and did a re-think on everything. Nothing I had originally put together would have survived the ride he took me on if something would have gone wrong.

The point I'm trying to make is, build it like your life or whoever is strapped in next to you may depend on it with it being operating it outside it's intended use.
Because your top roof and down tubes are one piece I would Install the cross bracing on the rear down tubes so you have plenty of head clearance and down to the torsion housing if possible. This is not the best way to do it but something in this case it is way better than nothing.

_________________
Of all the things I've lost, I miss my mind the most.
M
A
G
A


Top
 Profile  
 
 Post subject: Re: Rail Buggy Upgrade
PostPosted: Tue Dec 11, 2012 1:26 pm 
Offline

Joined: Sat Jan 27, 2007 12:38 am
Posts: 961
Location: Kettering Ohio
I see that you have a V brace on the rear bars already that end at the transmission mount. Try to get some bracing on the rear for sure but what looks like the more "critical" area to me is the windshield layback angle. You have a short roof with long down tubes forming the windshield and they are at a pretty flat angle. It may be worth some effort to add bars higher up the windshield that come back to the top main rail. Like the ones in the corners but higher up. That area looks like a potential problem area to me, even more so than behind the seats. I'm just a garage builder so what I say is only worth the air it took to get it out. Just my observations.

_________________
"Obstacles are those frightful things you see when you take your eyes off your goal." -Henry Ford


Top
 Profile  
 
 Post subject: Re: Rail Buggy Upgrade
PostPosted: Tue Dec 11, 2012 1:58 pm 
Offline

Joined: Sun Jan 08, 2012 4:37 pm
Posts: 474
Location: Southern Indiana
Yeah I thought about that too... It does lay back pretty far... I am not sure what I will do at this point... Guess I will cut out the one tube I have so far and look it over... I can add the front windshield brace... And will try to figure out the rear hoop... not going to be easy... i am not a 100 % sure I can do the rear hoop... I am stuck.


Top
 Profile  
 
 Post subject: Re: Rail Buggy Upgrade
PostPosted: Tue Dec 11, 2012 2:57 pm 
Offline

Joined: Sun Jan 08, 2012 4:37 pm
Posts: 474
Location: Southern Indiana
Madmike... That should work... And is what I will do... And I will also do something for the windshield as well... Please let me know if any of you guys have examples... Thanks for bringing that up on the rear X brace I will move it back so I have clearance for the seat and head...

Thanks guys... Feeling better about the hoop brace now.


Top
 Profile  
 
 Post subject: Re: Rail Buggy Upgrade
PostPosted: Tue Dec 11, 2012 6:51 pm 
Offline

Joined: Sun Jan 08, 2012 4:37 pm
Posts: 474
Location: Southern Indiana
Sitting here trying to Think about the windshield support... You think I should run one all the way up from the corner down? Or half... I am going to cut the rear X brace I started out when I get home and clean it up so I can start over


Top
 Profile  
 
 Post subject: Re: Rail Buggy Upgrade
PostPosted: Tue Dec 11, 2012 8:46 pm 
Offline
WB Contributor
User avatar

Joined: Thu Sep 06, 2012 2:23 pm
Posts: 1212
Location: Chattanooga Tennessee
Place the windshield support where you can get in and out and try to have it land over a vertical brace if possible.

_________________
Water Cooled Consortium, Chairman of the Build (Former AC purist)


Top
 Profile  
 
 Post subject: Re: Rail Buggy Upgrade
PostPosted: Wed Dec 12, 2012 12:46 am 
Offline
WB Contributor

Joined: Mon Apr 28, 2008 1:49 pm
Posts: 1107
Location: cinti,oh
yeh a windshield brace wil keep it from totally crushing your head and is a good idea :idea: as far as my x brace , one bar was allready in it when i go it so i just macthed it up with the other bar! but personally i think if you leaned them back a little past the hoop to the bars headed back it would be o.k. .. its still support! and the more bars you have coming together in a close range the stronger it is gonna be! dont think for one second your not gonna climb in that thing, eventually you will :wink: and if you roll or flip you'll be thankful that you went thru all the bullshit when you walk away from it.

_________________
ANTI- antifreeze!!!!!!


Top
 Profile  
 
 Post subject: Re: Rail Buggy Upgrade
PostPosted: Thu Dec 13, 2012 2:05 pm 
Offline

Joined: Sun Jan 08, 2012 4:37 pm
Posts: 474
Location: Southern Indiana
OK,I am going to try to get the X brace done and out of the way today... and I hope I will have two lengths of tube left to do the windshield brace as well... (its cold out)...

So I need some help deciding on the upper location of the Hoop Brace (X Brace) I will lean it back to clear the driver/passenger heads... just need to know should I shoot for the middle (#1) of the shock area or go back to where it intersects the tube (#2)... see here:

Image

Once you guys conf... I will knock it out...


Top
 Profile  
 
 Post subject: Re: Rail Buggy Upgrade
PostPosted: Thu Dec 13, 2012 2:19 pm 
Offline
Master fabricator
User avatar

Joined: Fri Mar 02, 2007 11:55 pm
Posts: 2304
Location: S.W. Pa. Wellsville Water Cooled Chapter
Keep it as close as you can to the upper corners and have plenty of head clearance. Think about padding too.

_________________
Of all the things I've lost, I miss my mind the most.
M
A
G
A


Top
 Profile  
 
Display posts from previous:  Sort by  
Post new topic Reply to topic  [ 455 posts ]  Go to page Previous  1 ... 9, 10, 11, 12, 13, 14, 15 ... 19  Next

Board index » General » Buggy Builds

All times are UTC - 5 hours [ DST ]


Who is online

Users browsing this forum: No registered users and 2 guests


You cannot post new topics in this forum
You cannot reply to topics in this forum
You cannot edit your posts in this forum
You cannot delete your posts in this forum
You cannot post attachments in this forum

Search for:
Jump to:  
Powered by phpBB® Forum Software © phpBB Group