It is currently Sat Apr 27, 2024 2:14 am

Board index » Tech and Fab » Air Cooled Engines

All times are UTC - 5 hours [ DST ]


Post new topic Reply to topic  [ 43 posts ]  Go to page 1, 2  Next
Author Message
PostPosted: Thu Jan 31, 2013 7:29 pm 
Offline

Joined: Sun Jan 08, 2012 4:37 pm
Posts: 474
Location: Southern Indiana
Hey guys, I am looking to get a oil cooler kit for my Rail, I figure with me running 9:4:1 compression and having a .050 deck on a w130 cam its going to get hot :twisted: so I want to try to compensate. What are your thoughts? I don't like the hardware, nor do I like the oil filter mount... but I should be able to get it all to work. My case is already full flowed... just have nothing to hook it up to.


Last edited by myrddin on Fri Feb 15, 2013 7:58 pm, edited 2 times in total.

Top
 Profile  
 
PostPosted: Thu Jan 31, 2013 8:31 pm 
Offline

Joined: Tue Dec 25, 2012 2:22 am
Posts: 335
Location: monroe indiana
Ya it sound like what u want as long as all fittings and hose aee 1/2 in and not 3/8 price wise idk


Top
 Profile  
 
PostPosted: Thu Jan 31, 2013 9:00 pm 
Offline

Joined: Sun Jan 08, 2012 4:37 pm
Posts: 474
Location: Southern Indiana
What about the full flow stuff... Currently I have the oil pump cover and my case is opened up as well... I have a fitting off the case right below the distributer area... I am wondering if I should just get the cooler with fan and a oil filter thing...

Thoughts?


Top
 Profile  
 
PostPosted: Thu Jan 31, 2013 10:19 pm 
Offline
WB Contributor
User avatar

Joined: Thu Sep 06, 2012 2:23 pm
Posts: 1212
Location: Chattanooga Tennessee
Some times you can get a better package deal than buying stuff individually. Most of it is made overseas. If the budget allow go for AN style aircraft connectors. You might not have to take it all apart to many times but it will save your hose and keep you from talking dirty. :mrgreen: :mrgreen:

_________________
Water Cooled Consortium, Chairman of the Build (Former AC purist)


Top
 Profile  
 
PostPosted: Thu Jan 31, 2013 11:53 pm 
Offline

Joined: Sun Jan 08, 2012 4:37 pm
Posts: 474
Location: Southern Indiana
I don't see any that include the fittings... I am trying to figure out what is the best way to go... That kit has everything I need to install plus things I don't. Or I could get a 96 row cooler with a fan for like 150.00 and a thermostat for 30.00 and still need the oil filter bracket and hose... Not sure. I am guessing I need one. I don't mind used stuff too.... Sometimes you get better stuff that way.


Thinking it over...


Top
 Profile  
 
PostPosted: Wed Feb 13, 2013 2:11 pm 
Offline

Joined: Sun Jan 08, 2012 4:37 pm
Posts: 474
Location: Southern Indiana
OK my parts showed up... I need to figure out where to mount the cooler and filter... Ideas? Looks like most people mount it above the transmission? I need to go out to the garage and see where it fits... Wish I had heat in the garage.

Let me know your ideas...

Image

Image

Image


Top
 Profile  
 
PostPosted: Wed Feb 13, 2013 2:26 pm 
Offline
WB Contributor
User avatar

Joined: Thu Sep 06, 2012 2:23 pm
Posts: 1212
Location: Chattanooga Tennessee
You can get the AN fittings from summit racing or jets. They have kits or you can buy the individually. :mrgreen:

_________________
Water Cooled Consortium, Chairman of the Build (Former AC purist)


Top
 Profile  
 
PostPosted: Wed Feb 13, 2013 3:37 pm 
Offline

Joined: Sun Jan 08, 2012 4:37 pm
Posts: 474
Location: Southern Indiana
OK so my thoughts were to get a bigger cooler, cause I may want a bigger frame down the road... well my current frame is small, and stuffed with a bunch of reinforcement (good thing) but it makes it crazy tight for adding more stuff... so any way I have 2 options that can be done two ways..

1. mount cooler below tank out of visibility near trans nose cone.
2. mount cooler above tank removing most rearward visibility.

1. mount cooler with hoses coming out and up.
2. mount cooler with hoses coming out to the side (or down if its mounted above the tank)

I like options 1 and 1 (cooler down low so I can still see... and hoses coming off the top and might use 45 AN fitting to route down the side) you get the idea...
Any more ideas I will check if it will fit... but unsure what to do at this point...


Last edited by myrddin on Wed Mar 06, 2013 9:10 pm, edited 1 time in total.

Top
 Profile  
 
PostPosted: Wed Feb 13, 2013 4:15 pm 
Offline

Joined: Sun Jan 08, 2012 4:37 pm
Posts: 474
Location: Southern Indiana
two more ideas... Behind the driver or passenger seat (not sure if it would be loud next to someone's head... or I may be able to move it back above the motor low enough so I can still see out the back (this is a good option).


Last edited by myrddin on Wed Mar 06, 2013 9:11 pm, edited 1 time in total.

Top
 Profile  
 
PostPosted: Wed Feb 13, 2013 4:39 pm 
Offline

Joined: Sun Jan 08, 2012 4:37 pm
Posts: 474
Location: Southern Indiana
OK last one... along the lines of not knowing how loud it is (and yes I know its loud as hell anyway) there is also the x brace mount... which looks like it would work as well...

what do you folks think?


Last edited by myrddin on Wed Mar 06, 2013 9:12 pm, edited 1 time in total.

Top
 Profile  
 
PostPosted: Wed Feb 13, 2013 8:55 pm 
Offline

Joined: Sat Feb 24, 2007 12:02 am
Posts: 349
Location: Germantown Ohio
What about laying it flat,right over the top of the trans?


Top
 Profile  
 
PostPosted: Wed Feb 13, 2013 9:54 pm 
Offline

Joined: Sun Jan 08, 2012 4:37 pm
Posts: 474
Location: Southern Indiana
time to start the install


Last edited by myrddin on Wed Mar 06, 2013 9:13 pm, edited 1 time in total.

Top
 Profile  
 
PostPosted: Thu Feb 14, 2013 12:51 am 
Offline
WB Contributor
User avatar

Joined: Wed Jun 09, 2010 7:09 pm
Posts: 1025
Location: batavia ohio 45103
mine is under fuel tank with fan facing down towards the tranny

_________________
Hey,can you hand me those zip ties and that roll of duct tape?!


Top
 Profile  
 
PostPosted: Thu Feb 14, 2013 8:27 am 
Offline

Joined: Sun Jan 08, 2012 4:37 pm
Posts: 474
Location: Southern Indiana
I may be able to get it to go half way under the tank but the gas line valve is in the way for it to go any farther...


Last edited by myrddin on Wed Mar 06, 2013 9:13 pm, edited 1 time in total.

Top
 Profile  
 
PostPosted: Thu Feb 14, 2013 5:14 pm 
Offline

Joined: Sun Jan 08, 2012 4:37 pm
Posts: 474
Location: Southern Indiana
OK I found a location that will work well enough... I will post pics when its all together... need to weld in something to bolt it to and I need to weld in the filter bracket... Also need to weld in the battery tray and the cutting brake bracket... after that I hope to not need to weld anything for a while... hope to do this and start my wire harness install this weekend.


Top
 Profile  
 
PostPosted: Fri Feb 15, 2013 7:57 pm 
Offline

Joined: Sun Jan 08, 2012 4:37 pm
Posts: 474
Location: Southern Indiana
I built brackets and welded them in today, I am pretty happy with the turn out... This frame is so small, it makes everything a challenge. But I am getting there. Also welded in the filter mount as well in the only place left... I still need a breather no idea where I am going to put it...

Paint is wet now, once its dry and I have the stuff bolted up I will post the pic's. I also welded in my cutting brake mount, Battery Tray and seat belt brackets... I hope to start the electrical stuff tomorrow.


Only thing I didn't account for was the oil drain back... I had hoped to keep my out up high so it sat in the cooler, but I just couldn't fit it the way I wanted... so this way may put me in the drain back situation... Do they make a check valve? I guess I will draw it all up and look at it.. it still might work out anyway...

I'm getting there...


Top
 Profile  
 
PostPosted: Sat Feb 16, 2013 9:08 pm 
Offline

Joined: Sun Jan 08, 2012 4:37 pm
Posts: 474
Location: Southern Indiana
All done... I just need to figure out my hose path, length and fittings...

Image

Image

Image

Image

Image

Over all I am pretty happy with the outcome... Any tips on how to route the hose... I know its out from the motor to the filter to the cooler and then back to the motor... but how do I keep the hoses away front he hot stuff? And where is the best place to put the thermostat?

thnx :)


Top
 Profile  
 
PostPosted: Tue Mar 05, 2013 11:38 am 
Offline

Joined: Sun Jan 08, 2012 4:37 pm
Posts: 474
Location: Southern Indiana
I think my push loc fittings and hoses will be in tomorrow.. But I have a question... Someone told me I should run a oil thermostat bypass valve on the oil cooler lines going to the cooler.. True? If so I need more parts...


Top
 Profile  
 
PostPosted: Wed Mar 06, 2013 10:29 am 
Offline

Joined: Sun Oct 03, 2010 11:39 am
Posts: 76
Location: Bakersfield Ca
I wouldnt bother with the bypass just one more thing to go wrong. I rode for years in ohio temps never had one no problems.


Top
 Profile  
 
PostPosted: Wed Mar 06, 2013 2:56 pm 
Offline

Joined: Sun Jan 08, 2012 4:37 pm
Posts: 474
Location: Southern Indiana
well I ask cause I do have the fan thermostat in line that kicks the fan on at like 175/180 (I forget) this oil bypass valve sounds like it does the same thing... it bypasses the cooler till it hits 175/180 then it sends it to the cooler to cool it down... where in my case it goes through the cooler, but no fan should be on till it hits 175/180... all sounds the same to me...

pic of what I was told:
Image

Part in question:
http://www.sandparts.com/servlet/the-24601/Derale-180%3F%3F-Fluid-Control/Detail

All sounds same... I may skip


Top
 Profile  
 
PostPosted: Thu Mar 07, 2013 8:00 pm 
Offline

Joined: Sun Jan 08, 2012 4:37 pm
Posts: 474
Location: Southern Indiana
Well, I started to put my fittings in so I can run my hose tonight and I found a problem that I am unsure what to do with... I think I noticed a small crack in the upper full flow port... I can still trun the fitting in but I am not sure what to expect from the crack afterwards... can I use some JB weld or should I just try it... I am a little bummed out... and broke...

what do you folks think

I tried to get a pic of the inside (will keep trying)
Image

This is a shot of the top, you can see a gray line about 3/4 inch long or so...
Image

This is the fitting, that I will use:
Image

man, this thing is all up hill... not sure what to do...


thanks


Top
 Profile  
 
PostPosted: Thu Mar 07, 2013 8:47 pm 
Offline

Joined: Sun Oct 03, 2010 11:39 am
Posts: 76
Location: Bakersfield Ca
That crack is from over tighting the fitting in the case. Ask me how i no this, it dont take muck to crack it. Clean it up good an put JB weld on the outside of the crack itll be ok. Just dont overtighten the fitting when reinstalling. That switch you have that turns the fan on works ok for awile. I usually wire the fan to the ignition or put it on a toggle.


Top
 Profile  
 
PostPosted: Thu Mar 07, 2013 9:33 pm 
Offline

Joined: Sun Jan 08, 2012 4:37 pm
Posts: 474
Location: Southern Indiana
well I may have done it I guess... but not so sure... could have been there all this time I don't know... how should I try the JB weld? should I screw in the fitting till its tight (how tight ) then apply the jb weld in that area where there seems to be a crack? and then just forget about it? pretty bummed out...

I have cleaned the top of that area real well... its down to shiny metal... how tight is tight enough in this situation I am afraid if I put JB weld on first and then tighten the fitting it will crack the jb weld...

man... I guess let me know how you think I should do it.. and I will try...


Top
 Profile  
 
PostPosted: Thu Mar 07, 2013 9:43 pm 
Offline
WB Contributor
User avatar

Joined: Thu Sep 06, 2012 2:23 pm
Posts: 1212
Location: Chattanooga Tennessee
Use some thread sealant in the fitting and don't tighten it up a lot the pipe dope will seal the threads. Jb weld the outside and it should be an issue. That happens to be a common failure point much like the oil preasure sending unit. The threads are tapered on NP fittings so if they are tightened a little to much they act like a log splitter.

_________________
Water Cooled Consortium, Chairman of the Build (Former AC purist)


Top
 Profile  
 
PostPosted: Thu Mar 07, 2013 10:02 pm 
Offline
User avatar

Joined: Thu Dec 06, 2007 10:55 pm
Posts: 292
Location: Charleston WV
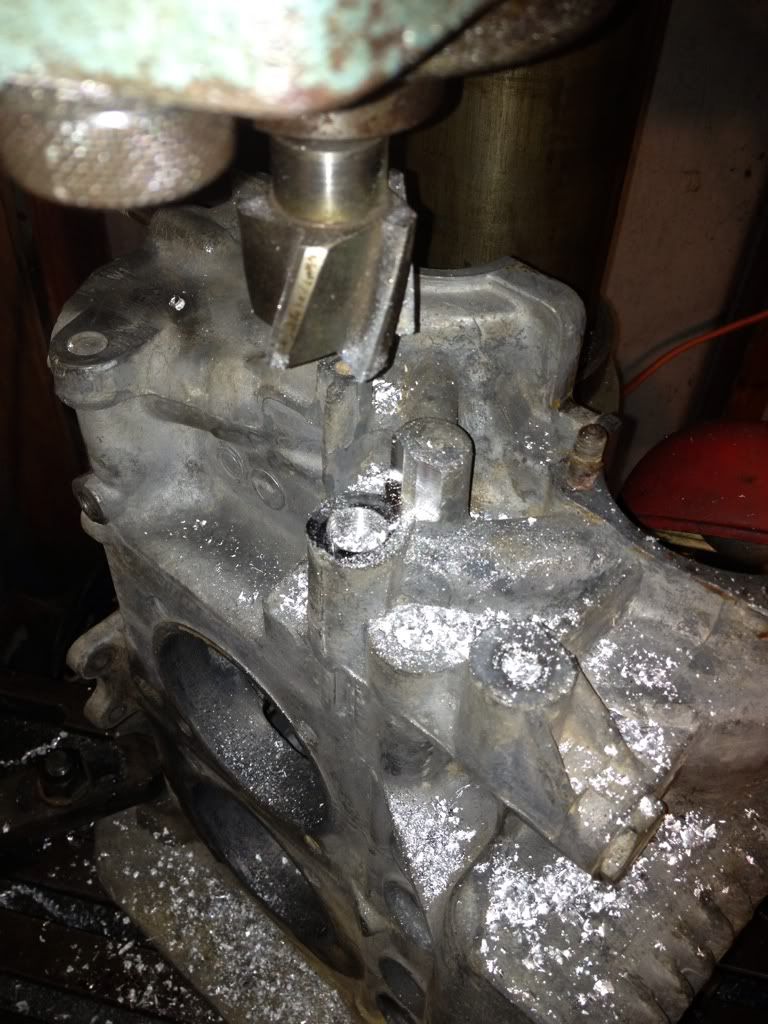
It looks like the full flow was drilled the hole is too high in the casting and it makes it thin at the top. I like to full flow the case in the mill and offset the hole 1or2mm lower in the case. The crack can be welded or the JB weld may work also. Image

_________________
Travis


Top
 Profile  
 
Display posts from previous:  Sort by  
Post new topic Reply to topic  [ 43 posts ]  Go to page 1, 2  Next

Board index » Tech and Fab » Air Cooled Engines

All times are UTC - 5 hours [ DST ]


Who is online

Users browsing this forum: No registered users and 40 guests


You cannot post new topics in this forum
You cannot reply to topics in this forum
You cannot edit your posts in this forum
You cannot delete your posts in this forum
You cannot post attachments in this forum

Search for:
Jump to:  
Powered by phpBB® Forum Software © phpBB Group