It is currently Sat Apr 27, 2024 4:28 am

Board index » General » Buggy Builds

All times are UTC - 5 hours [ DST ]


Post new topic Reply to topic  [ 11 posts ] 
Author Message
 Post subject: Ohbuggy's Build
PostPosted: Sat Apr 05, 2014 8:45 am 
Offline

Joined: Sun Mar 16, 2014 7:20 am
Posts: 36
Location: Scioto County, Ohio
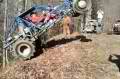
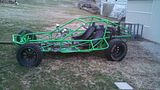
well, nothing epic here, but its my journey. I will put the photos on photobucket to keep things easy on me I'm going to post some of what I've already done and "get yall up to speed" so so speak. the buggy in question as it started. (images are clickable) its apparently an older berrien venture frame, appears to be a fairly stock/mild 1600, has a lightened flywheel and hd clutch, came with brand new alternator and starter.

Image

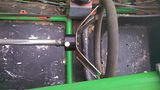
When I bought it I couldn't even fit in it with the steering wheel on, so quick detach had to be added!
Image

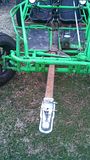
I am not interested in tagging it just yet so I welded a 3x3 x 3/16" reciever tube to a piece of 1/4" plate and welded that to the frame. (2.5x 2.5 3/16 bar fits right in there). its a little off center to clear the torsion adjusters but it works great.
Image

This stuff was done in the first few days of ownership, so its grouped into one post, I'll be grouping more photos/posts as I get them sorted


Top
 Profile  
 
 Post subject: Re: Ohbuggy's Build
PostPosted: Sat Apr 05, 2014 8:54 am 
Offline

Joined: Sun Mar 16, 2014 7:20 am
Posts: 36
Location: Scioto County, Ohio
one of the tree bars was broken when I bought it so off they both came and put on something a bit sturdier, this was decided based on the failure at the weld not the bar, welds not good, bars not up to par, grind it off and start over!

Image

Image

Tow bar receiver for moving trailer around yard
Image


Top
 Profile  
 
 Post subject: Re: Ohbuggy's Build
PostPosted: Sat Apr 05, 2014 9:07 am 
Offline

Joined: Sun Mar 16, 2014 7:20 am
Posts: 36
Location: Scioto County, Ohio
so yesterday I decided to fix the headache bars.... if I want to see stars in the daytime I go to Hollywood! I slugged the tube with 1 3/16" solid rod, cut into 1" long pieces, shoved in right off the cutter so they were hot and short so I could get weld penetration.

before:
Image

comparison shot
Image

damage done impromptu rust prevention followed after cool down and weld smoothing (not flat but to take off any sharps since your hands are there getting in and out)

Image

results - more traditional buggy lid, I like it. tons more headroom.


Top
 Profile  
 
 Post subject: Re: Ohbuggy's Build
PostPosted: Sat Apr 05, 2014 9:50 am 
Offline
User avatar

Joined: Fri Dec 28, 2012 4:05 am
Posts: 473
Location: connellsville, pa
Nice work. Looks a hell of a lot better! Keep up the good work. And keep the pics coming.


Sent from my iPhone

_________________
#If the throttle isn't floored, Your NOT havin FUN!!!!#


Top
 Profile  
 
 Post subject: Re: Ohbuggy's Build
PostPosted: Sun Apr 06, 2014 3:26 pm 
Offline

Joined: Sun Mar 16, 2014 7:20 am
Posts: 36
Location: Scioto County, Ohio
davidk wrote:
Nice work. Looks a hell of a lot better! Keep up the good work. And keep the pics coming.


Thanks for the compliment, slowly making progress.. currently in process, fuel pump and rewiring while adding some "death from above" protection and moving the switches and electrical around..
more on this later!


Top
 Profile  
 
 Post subject: Re: Ohbuggy's Build
PostPosted: Mon Apr 07, 2014 9:20 pm 
Offline

Joined: Sun Mar 16, 2014 7:20 am
Posts: 36
Location: Scioto County, Ohio
Todays progress, passenger area lid, fuel pump plumbed, overhead switch box, and rewiring the beast.. a good day all the way around. yes I know I just painted those bars, welcome to my insanity.

thanks for looking. the old switch box was done by p.o. it was a piece of angle with 3 holes in it.. it worked, but wires all hanging out etc.. things needed cleaned up, much better now :)

14 gauge diamond plate passenger lid. this should keep those pesky switches from getting muddy!

Image

overhead switch box..
Image

added a fuse block, trying to do it right!
Image


Top
 Profile  
 
 Post subject: Re: Ohbuggy's Build
PostPosted: Sat Apr 12, 2014 1:03 pm 
Offline

Joined: Sun Mar 16, 2014 7:20 am
Posts: 36
Location: Scioto County, Ohio
Ran into some trouble... found one my exhaust studs wallowed out and dropped out. Doing some investigation I am going to have to tap it out to a larger bolt. This puts me on hold a bit with finishing my u bend exhaust with super trapp on the end. Currently waiting on delivery of bottoming tap set

Sent from my MB886 using Tapatalk


Top
 Profile  
 
 Post subject: Re: Ohbuggy's Build
PostPosted: Sun Apr 13, 2014 12:13 pm 
Offline

Joined: Sun Mar 16, 2014 7:20 am
Posts: 36
Location: Scioto County, Ohio
upon investigation several of them are already replaced with 3/8x16 to 5/16x24 step studs, this looks ok by me and 5/16 is pretty much the same as 8mm diameter wise and the studs are only $1.50 for 1 instead of the metric alternative.. the ones already done seem to be holding well so we will see how this goes.

does anyone use a nail set or punch to dimple in their studs? I know with the heat in this area the loctites are generally not gonna work well, anyone have any other ideas on helping keep the stud in the block?


Top
 Profile  
 
 Post subject: Re: Ohbuggy's Build
PostPosted: Tue Apr 15, 2014 9:55 pm 
Offline

Joined: Sun Mar 16, 2014 7:20 am
Posts: 36
Location: Scioto County, Ohio
small update, exhaust stud repair went well, all buttoned up so I made a turn down with a older Supertrapp I had laying around, its all welded together and then I used the rubber bushing on the muffler to take some weight off the motor (meaning, exhaust studs) sounds much quieter, which is good since I want to start taking my son with me.

Image

a mirror so I can see where I am going when in reverse.

Image


Top
 Profile  
 
 Post subject: Re: Ohbuggy's Build
PostPosted: Tue Apr 15, 2014 10:11 pm 
Offline
WoodsBuggy Addict
User avatar

Joined: Fri Nov 14, 2008 9:45 pm
Posts: 2226
Location: Boone County West (BY GOD) Virginia
Just a suggestion but I'd put a brace on the side to the windsheild post since it lays so far back and I'd put an x brace behind the seats. You never know when your gonna end up on your top and you sure don't want it folding down on you. Chad :mrgreen:

_________________
NOW GAS IT!!!!!


Top
 Profile  
 
 Post subject: Re: Ohbuggy's Build
PostPosted: Tue Apr 15, 2014 10:50 pm 
Offline

Joined: Sun Mar 16, 2014 7:20 am
Posts: 36
Location: Scioto County, Ohio
I've heard that on other peoples posts, the seats would have to be moved forward to do it, I'm not disagreeing mind you, just means lots of little things (many that didn't do and some that I did) would then not be right. I thought about crossing back to the bottom bar back by the shock mount. that would leave enough room to leave things alone but get some extra support.


Top
 Profile  
 
Display posts from previous:  Sort by  
Post new topic Reply to topic  [ 11 posts ] 

Board index » General » Buggy Builds

All times are UTC - 5 hours [ DST ]


Who is online

Users browsing this forum: No registered users and 37 guests


You cannot post new topics in this forum
You cannot reply to topics in this forum
You cannot edit your posts in this forum
You cannot delete your posts in this forum
You cannot post attachments in this forum

Search for:
Jump to:  
Powered by phpBB® Forum Software © phpBB Group