Hi guys,
It seems like its taking forever for me to get my buggy repaired.
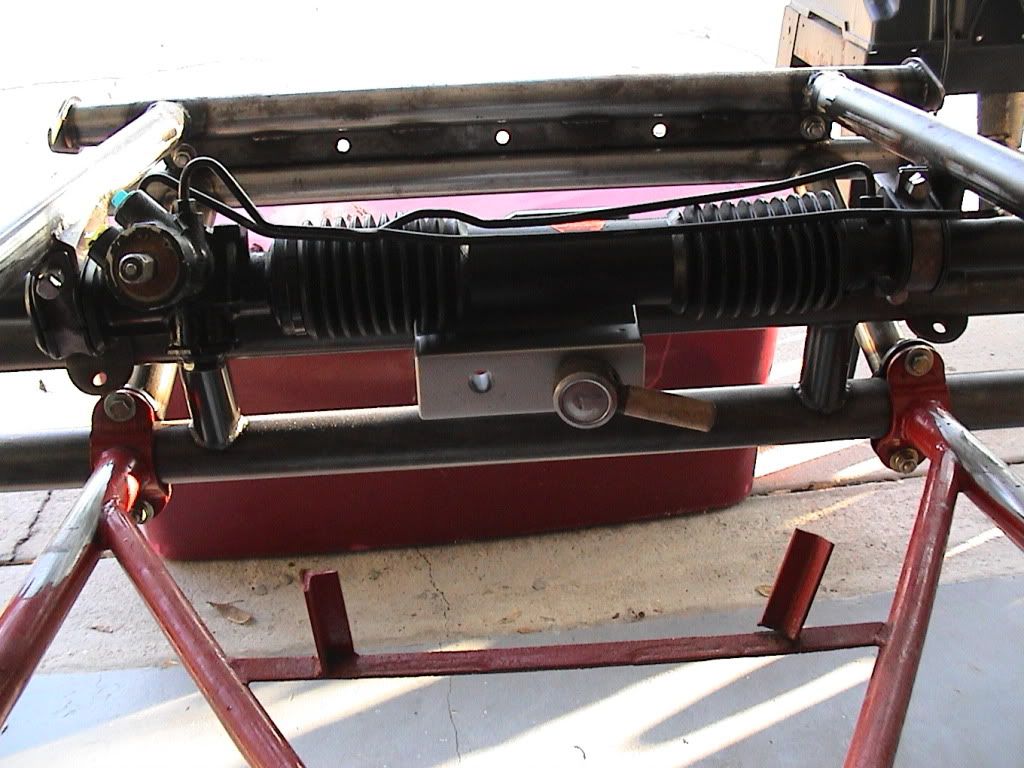
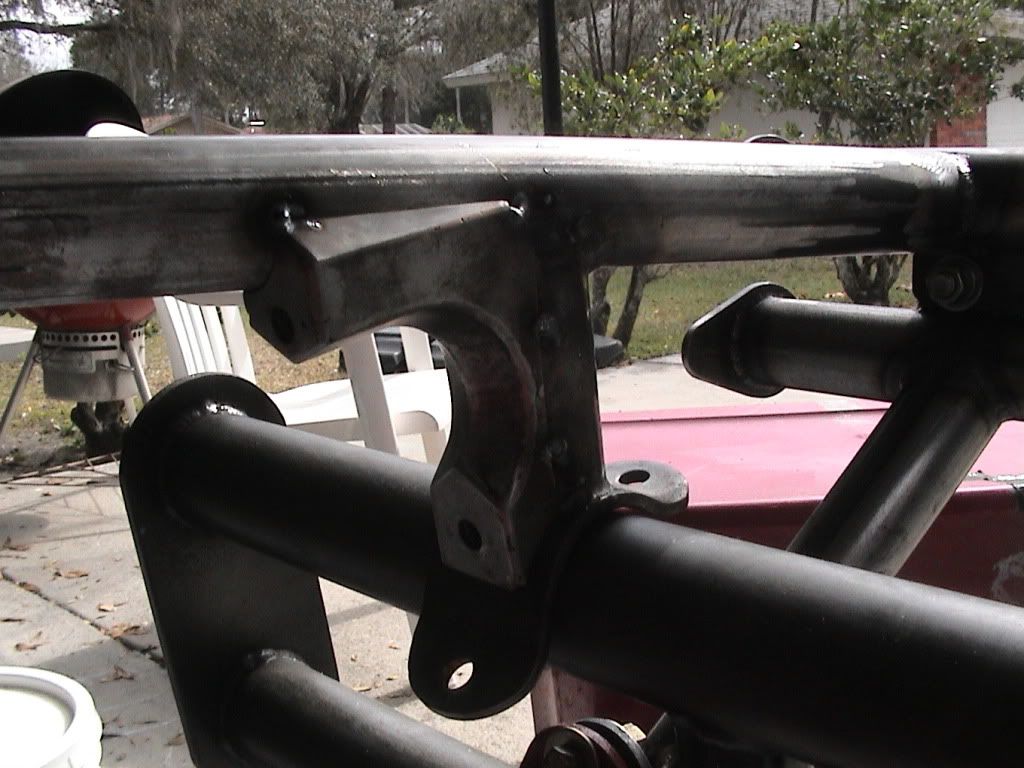
Any way here are some pictures of my rack setup. Its a mid 80's gm rack.
I guess right click on the pictures to see the whole thing.
| WoodsBuggy.com http://www.woodsbuggy.com/phpBB3/ |
|
| Sandbar Norm's Slow Rebuild http://www.woodsbuggy.com/phpBB3/viewtopic.php?f=23&t=14747 |
Page 1 of 2 |
| Author: | Sandbar Norm [ Tue Jan 29, 2013 8:24 am ] |
| Post subject: | Sandbar Norm's Slow Rebuild |
Hi guys, It seems like its taking forever for me to get my buggy repaired. Any way here are some pictures of my rack setup. Its a mid 80's gm rack. I guess right click on the pictures to see the whole thing.
|
|
| Author: | gasman [ Tue Jan 29, 2013 9:11 am ] |
| Post subject: | Re: Sandbar Norm's Slow Rebuild |
There was a lot of thought and fabrication went into this project.nice job and to say custom would be an understatement.Chad |
|
| Author: | Sandbar Norm [ Tue Jan 29, 2013 10:10 am ] |
| Post subject: | Re: Sandbar Norm's Slow Rebuild |
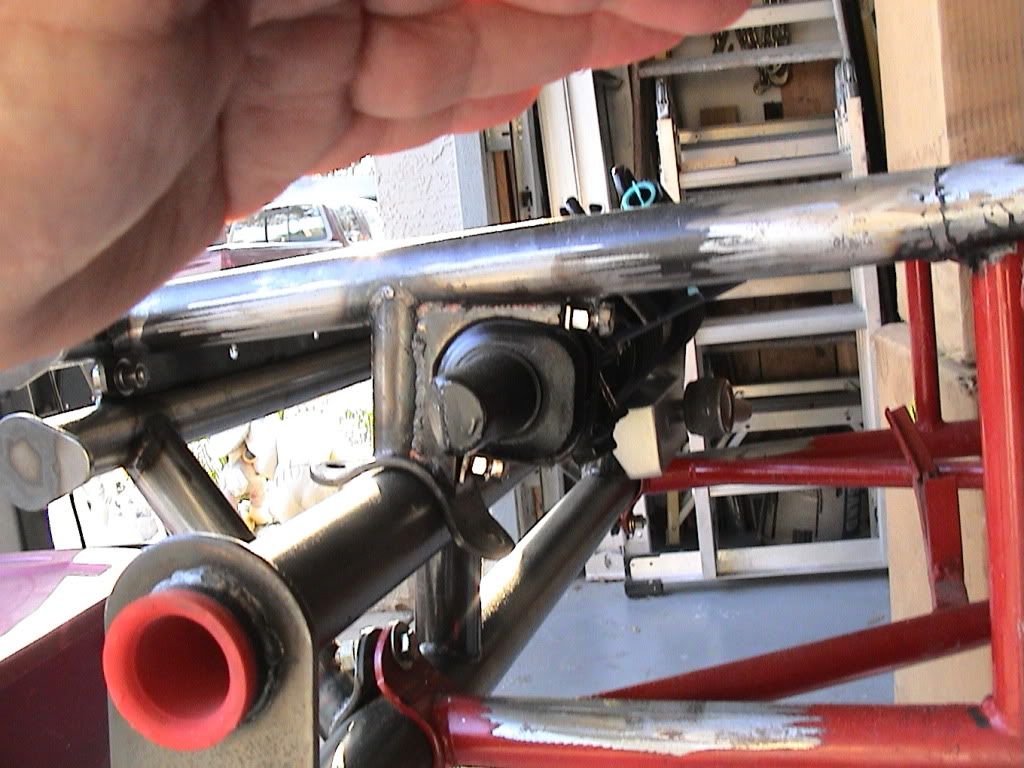
Thanks Gasman, Yes I did think about how I wanted to repair the damage from my roll over. Here how it looked for about 3 mo.s 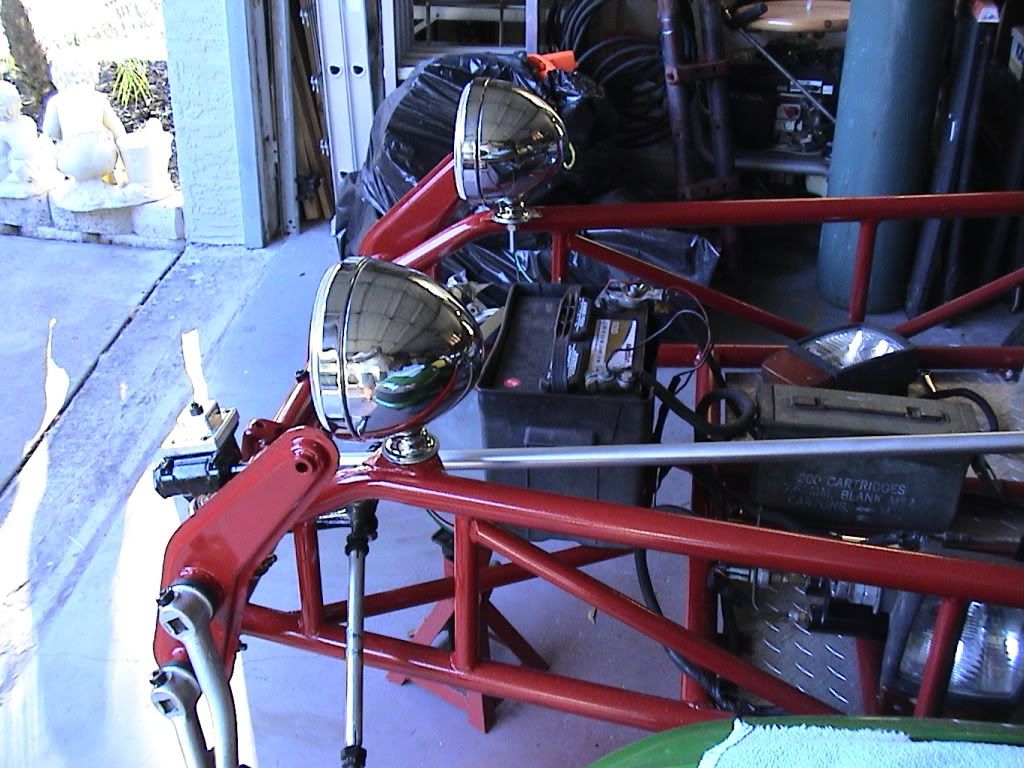 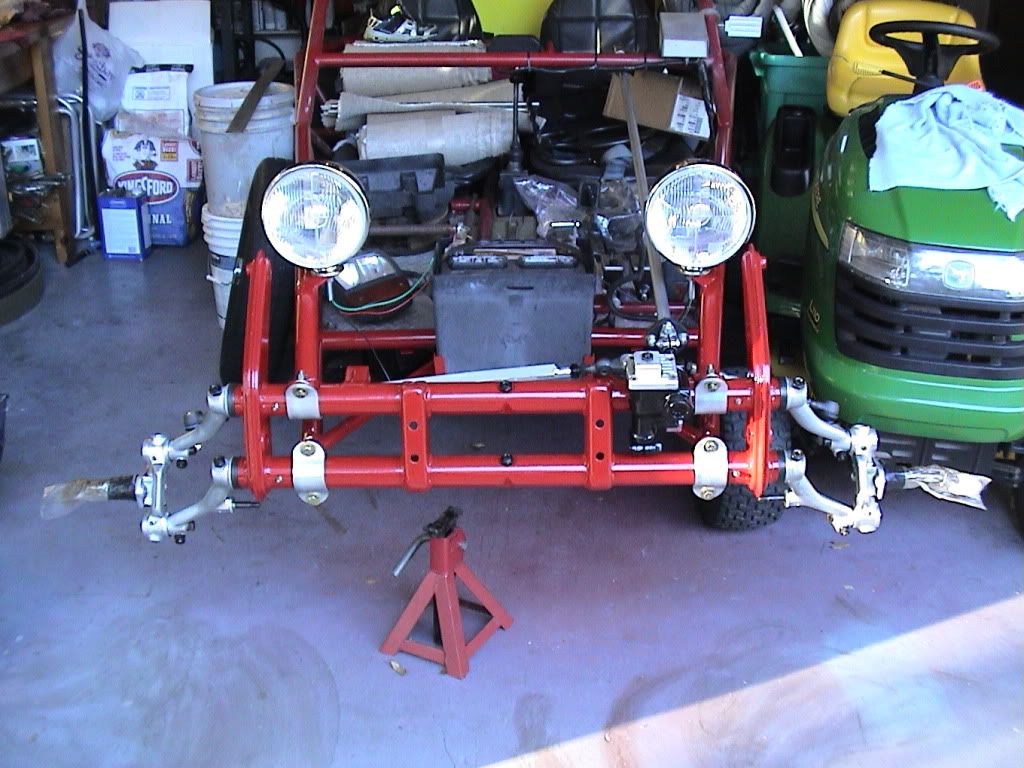 Then I cut the front off to fix the frame and decided that I would like rack and pinion steering on a budget. So I went with a drop down upper beam mount so I could maybe get a stock rack to work. 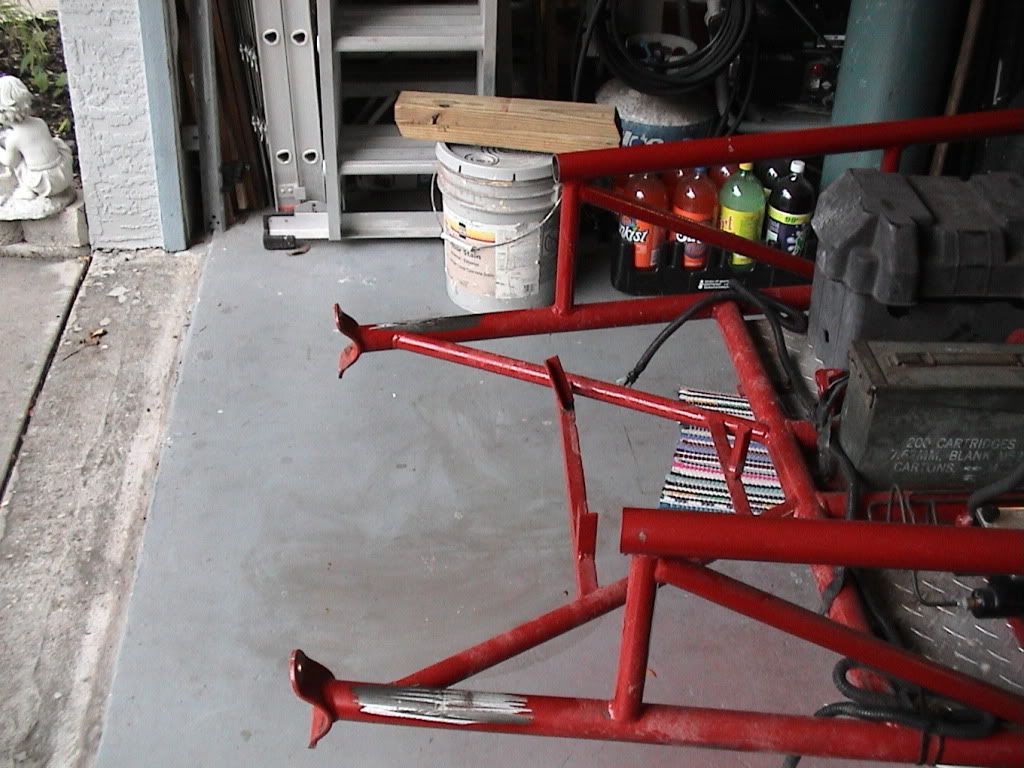 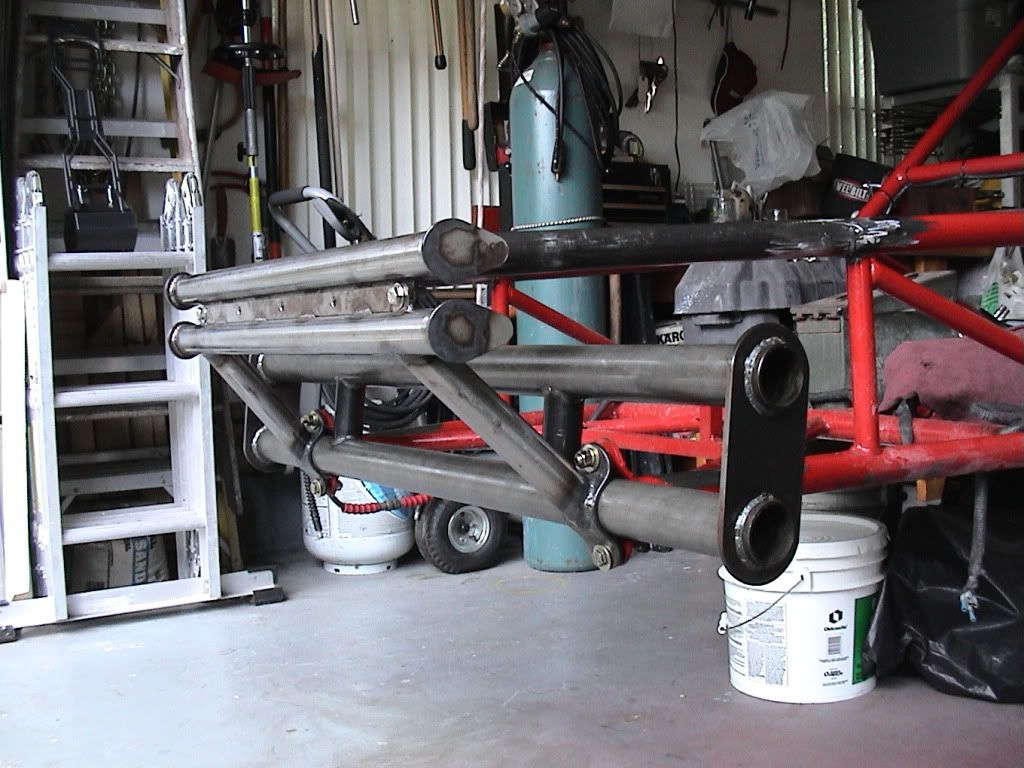
|
|
| Author: | Bubbalowe [ Tue Jan 29, 2013 1:37 pm ] |
| Post subject: | Re: Sandbar Norm's Slow Rebuild |
Nice rack, which GM rack is it? The sweetest thing about it is you can go down to the local parts store to buy it and it would probably have a warranty also. There is nothing better than power steering either! Great job |
|
| Author: | Sandbar Norm [ Tue Jan 29, 2013 1:57 pm ] |
| Post subject: | Re: Sandbar Norm's Slow Rebuild |
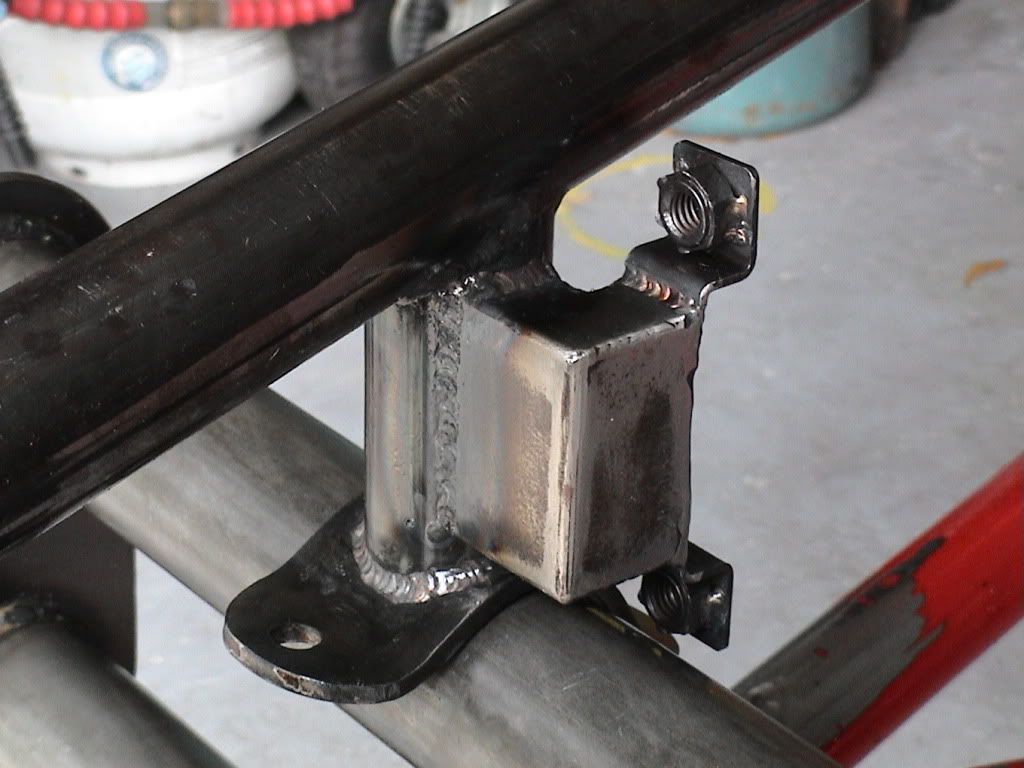
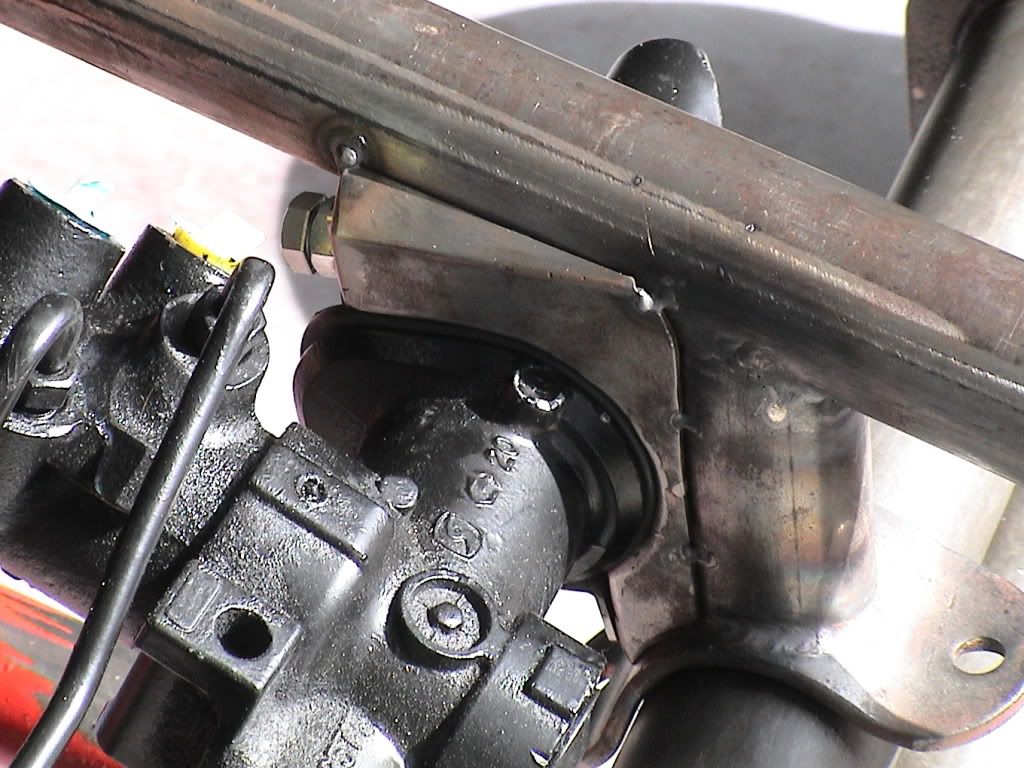
It's a 1985 Pontiac Grand Am Rack. $80. at Advanced Auto Parts, with life time warranty. http://shop.advanceautoparts.com/webapp ... 1|L2*15011 |
|
| Author: | Bubbalowe [ Tue Jan 29, 2013 3:45 pm ] |
| Post subject: | Re: Sandbar Norm's Slow Rebuild |
Sandbar Norm wrote: It's a 1985 Pontiac Grand Am Rack. $80. at Advanced Auto Parts, with life time warranty. http://shop.advanceautoparts.com/webapp ... 1|L2*15011 If that isn't enough, you don't have to cut and joint your steering shaft! |
|
| Author: | Red Barron [ Tue Jan 29, 2013 10:43 pm ] |
| Post subject: | Re: Sandbar Norm's Slow Rebuild |
Nice job Norm, love the cad drawings. With the new laser home cutters you can make just about anything |
|
| Author: | Sandbar Norm [ Wed Jan 30, 2013 7:52 am ] |
| Post subject: | Re: Sandbar Norm's Slow Rebuild |
Yes with a cad program I can make a lot of changes till I get the part the way I like it. I all most have my whole buggy drawn in my cad system. My plan is to complete the front end. Then do the rear. I have a set of Madmike 3x3s. Man do they look strong. I think I'm going with a airbag setup. I also have some suspension seats but not enough head room. So I may cut the top off or I will keep them for a 70 bronco that I have and me and my son (9 yrs old) are going to build. We need to finish the buggy first but I dont think you ever really finish. I work at a stamping manufacture so we have a lot of toys to play with and we get more all the time. http://gatorstamping.com/ You can see my ugly mug under the contacts. Norm |
|
| Author: | Bubbalowe [ Wed Jan 30, 2013 10:00 am ] |
| Post subject: | Re: Sandbar Norm's Slow Rebuild |
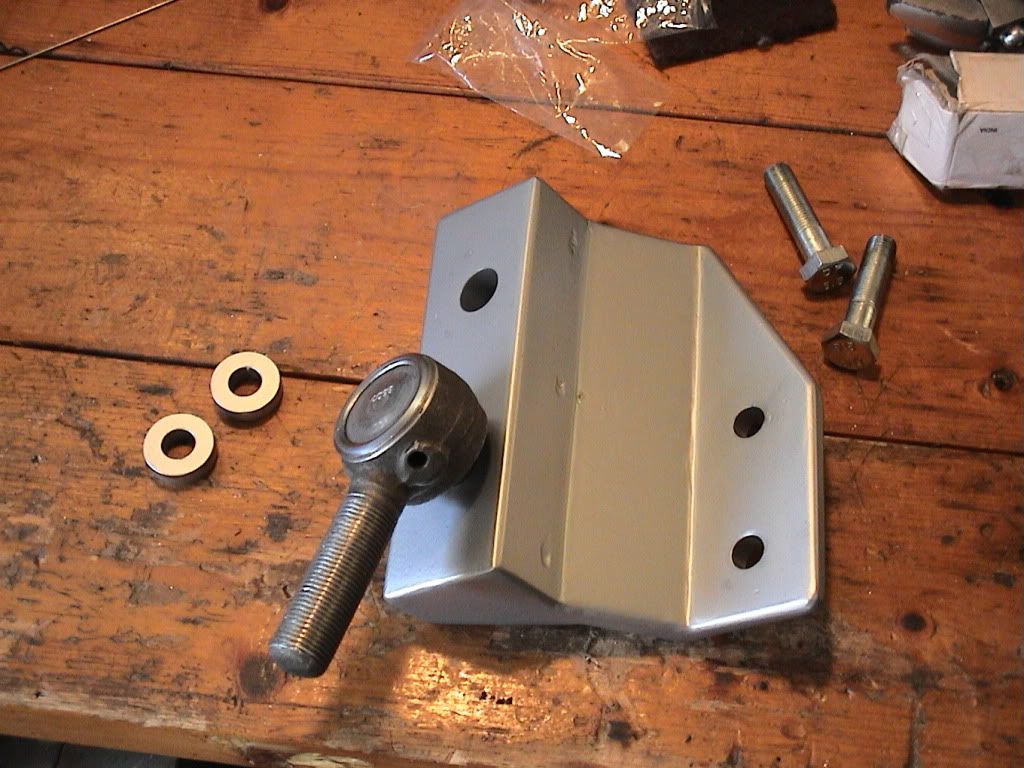
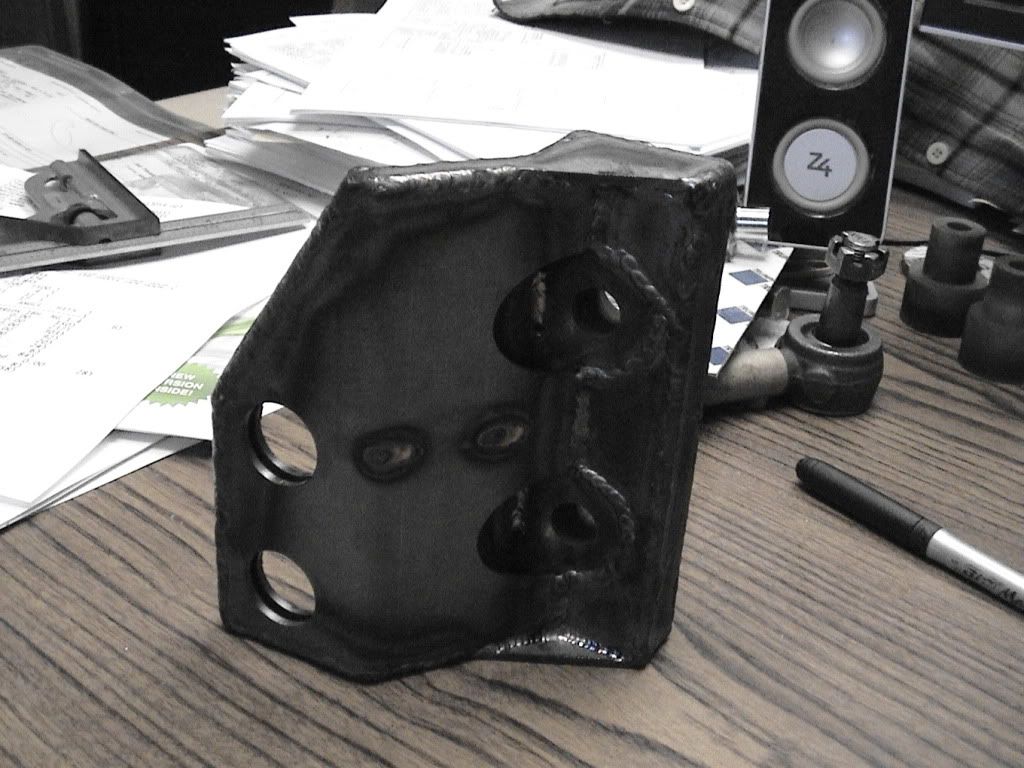
Sandbar Norm wrote: Yes with a cad program I can make a lot of changes till I get the part the way I like it. I all most have my whole buggy drawn in my cad system. My plan is to complete the front end. Then do the rear. I have a set of Madmike 3x3s. Man do they look strong. I think I'm going with a airbag setup. I also have some suspension seats but not enough head room. So I may cut the top off or I will keep them for a 70 bronco that I have and me and my son (9 yrs old) are going to build. We need to finish the buggy first but I dont think you ever really finish. I work at a stamping manufacture so we have a lot of toys to play with and we get more all the time. http://gatorstamping.com/ You can see my ugly mug under the contacts. Norm Would you have any interest in marketing the tie rod to rack mount or bracket pieces |
|
| Author: | Sandbar Norm [ Wed Jan 30, 2013 10:55 am ] |
| Post subject: | Re: Sandbar Norm's Slow Rebuild |
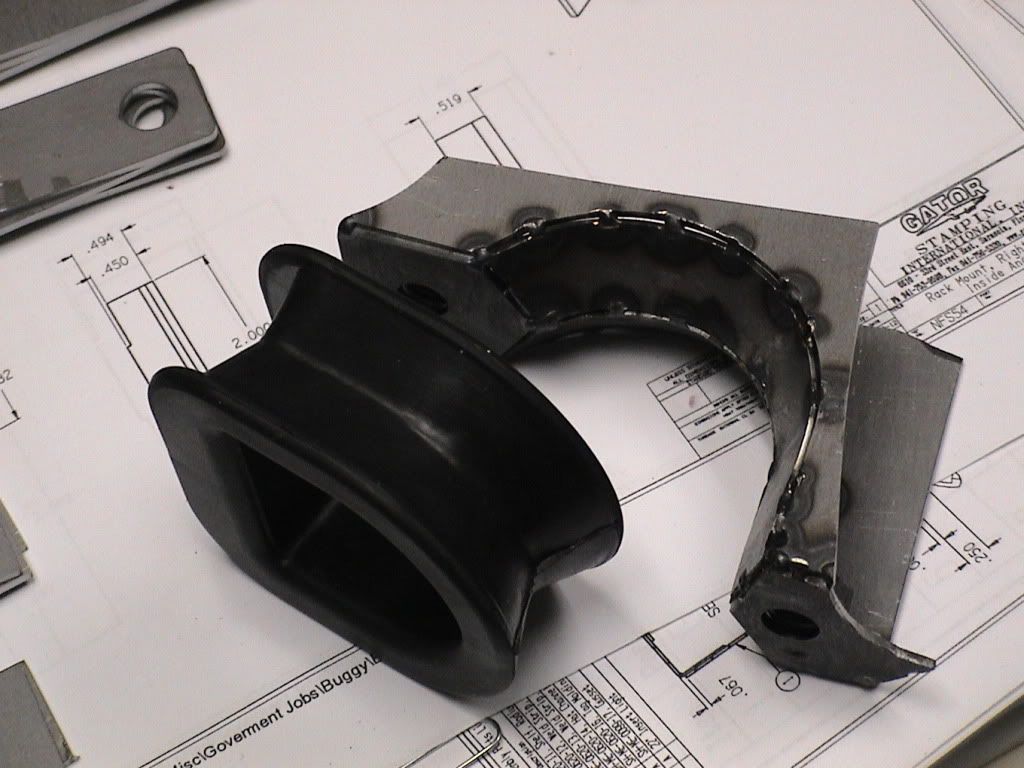
I hadn't thought about. It kind of a custom part to fit my setup. Look at the picture below. You see the lines on my top beam, the one on the right is my beam center line ant the one on the left is the rack center line. I offset my rack (1-3/16') so I could get clearance for the power steering lines. I then offset the tie rod bracket so I could keep my tie rods the same length. I think that this offset would be different for each rail. If I did I would have to come up with a different way to cut the tapers for the tie rods bushings. I tied up one of our edm's a while. 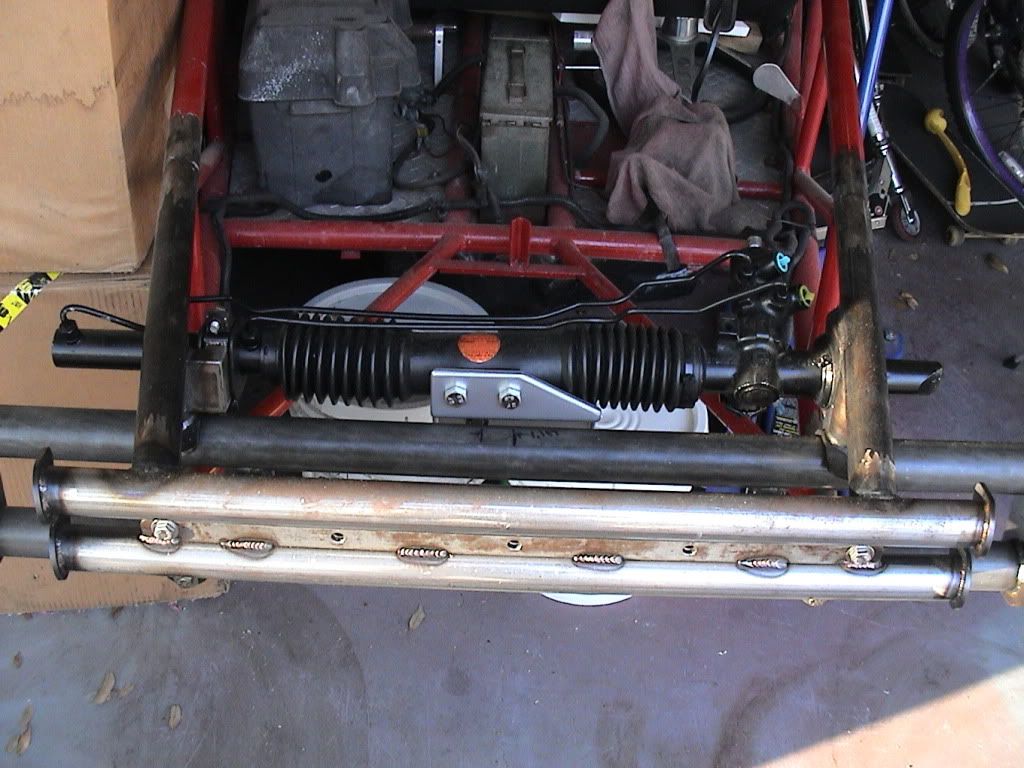 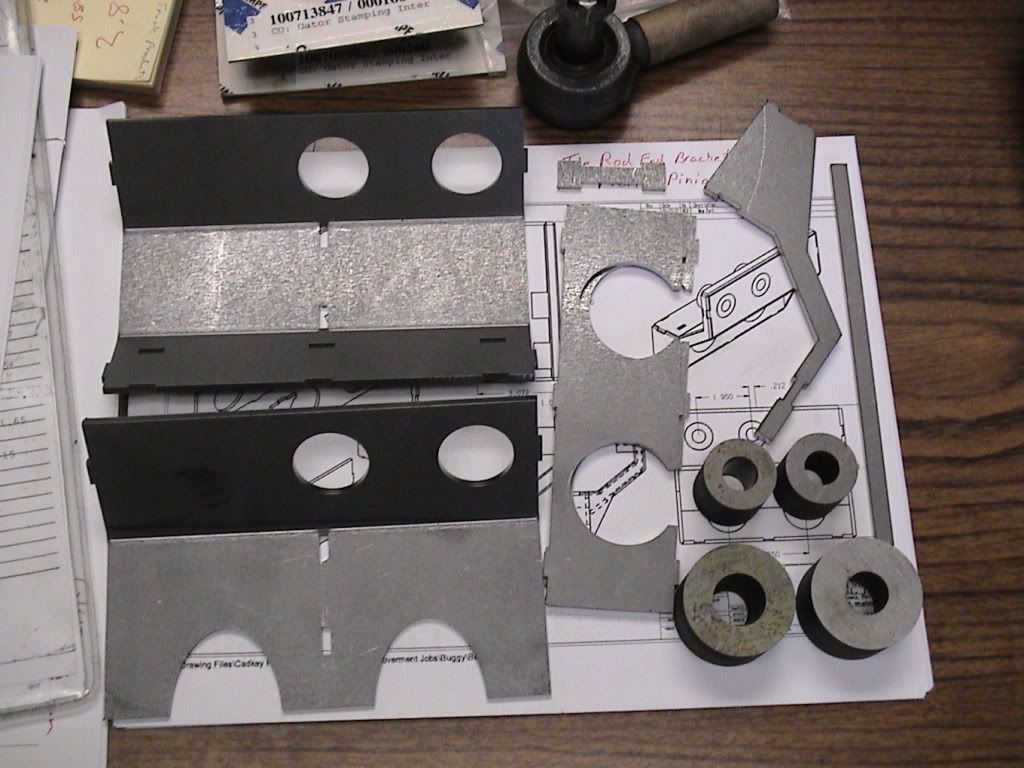
|
|
| Author: | MadMike [ Wed Jan 30, 2013 1:39 pm ] |
| Post subject: | Re: Sandbar Norm's Slow Rebuild |
It's about time Norm, you sharing your build and all. Looks like someone else knows how to plan things out and build them. Keep up the excellent work and keep posting your progress. |
|
| Author: | Dave_in_Florida [ Wed Jan 30, 2013 3:22 pm ] |
| Post subject: | Re: Sandbar Norm's Slow Rebuild |
Norm, you need to get that buggy done so you can ride with us! Riding season is here! |
|
| Author: | Sandbar Norm [ Wed Jan 30, 2013 3:35 pm ] |
| Post subject: | Re: Sandbar Norm's Slow Rebuild |
Thanks Mike, The only reason I didn't post a build before is sometimes I get to work on it a day or two then its on hold for about 4 weeks I do have a question. I have a lot of buggy drawn in my cad system so I can get an ideal on how I want things to fit together. I'm going to do 1-1/2" x .094 tube shock hoops with 1" x .125 hoop supports. I have seen that most of the one have been setup with the hoop support attaching from the hoop to a cross brace between the top two rails. I'm think about going from the hoop to the lower rails. (See cad images) Do you guys see any reason that this wont work?? 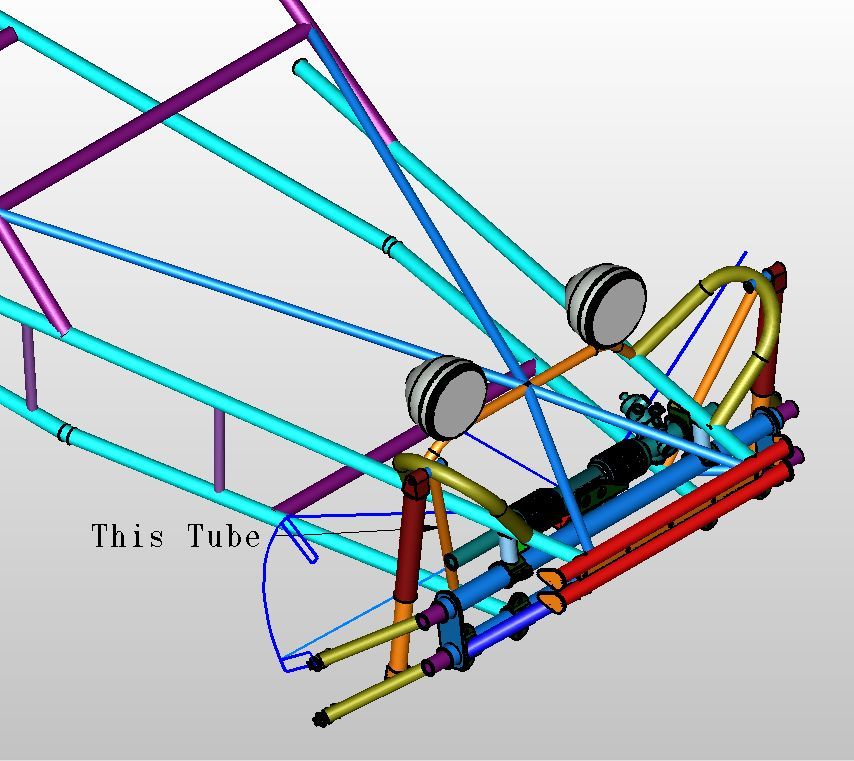 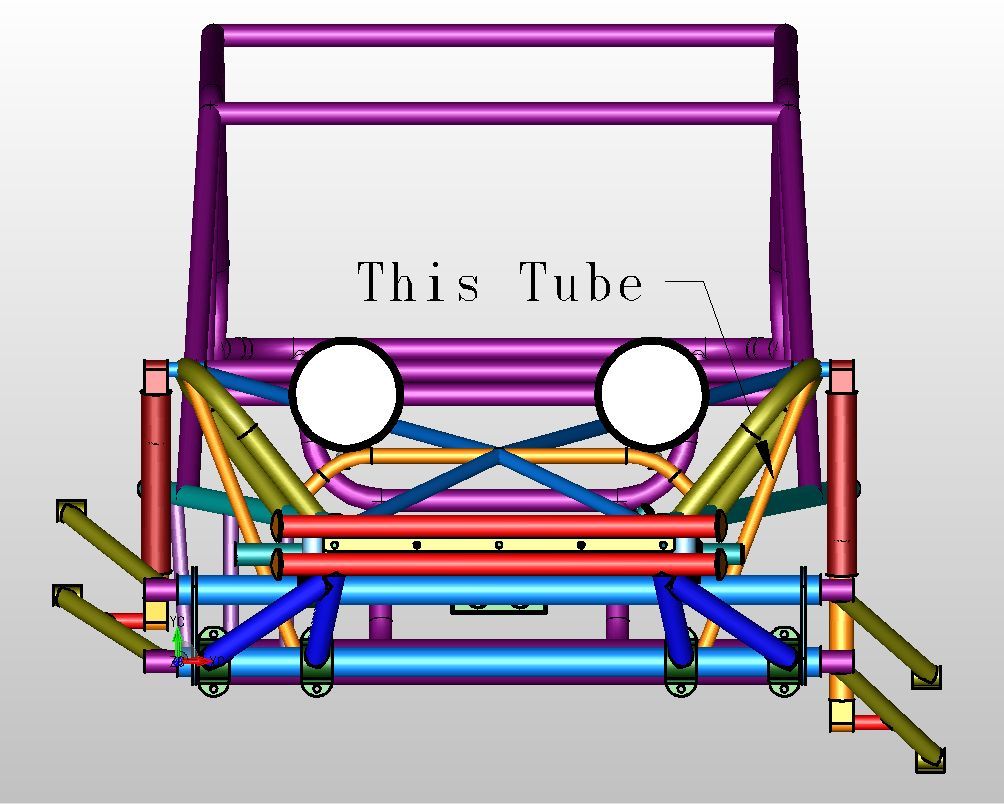 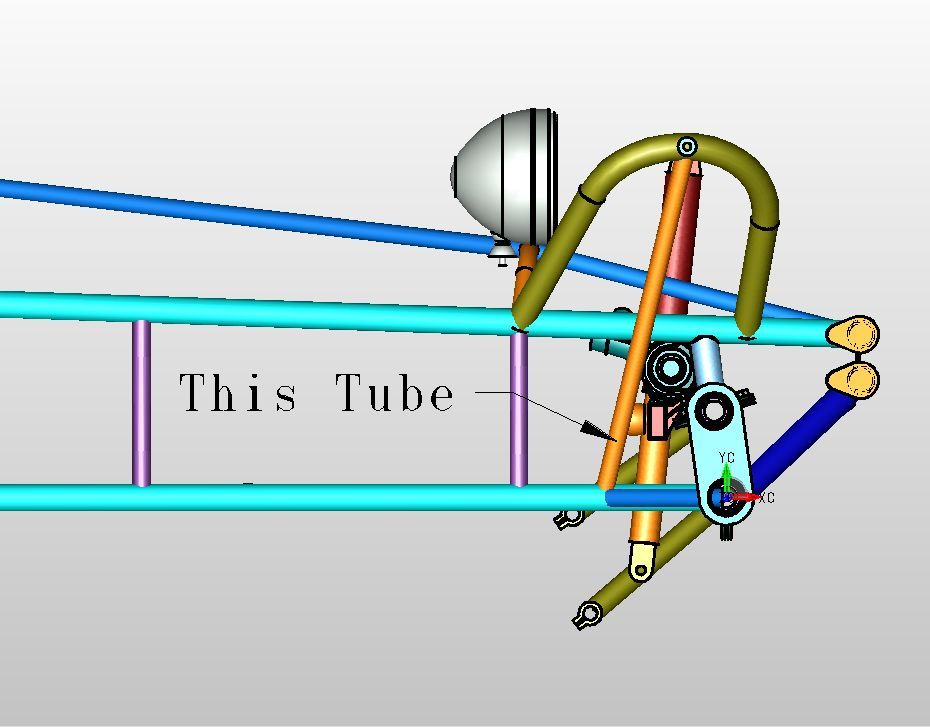 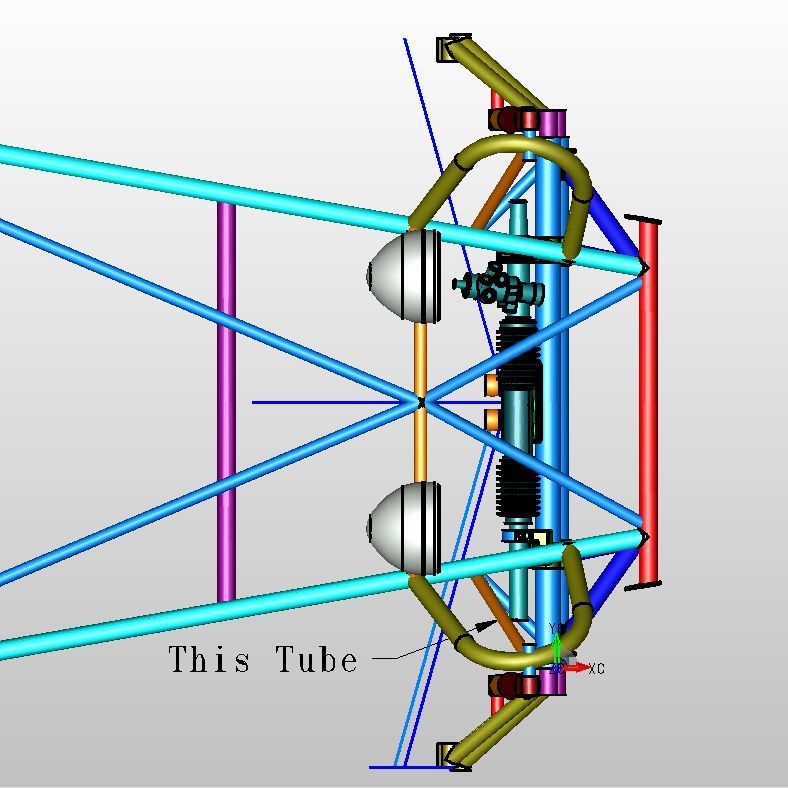 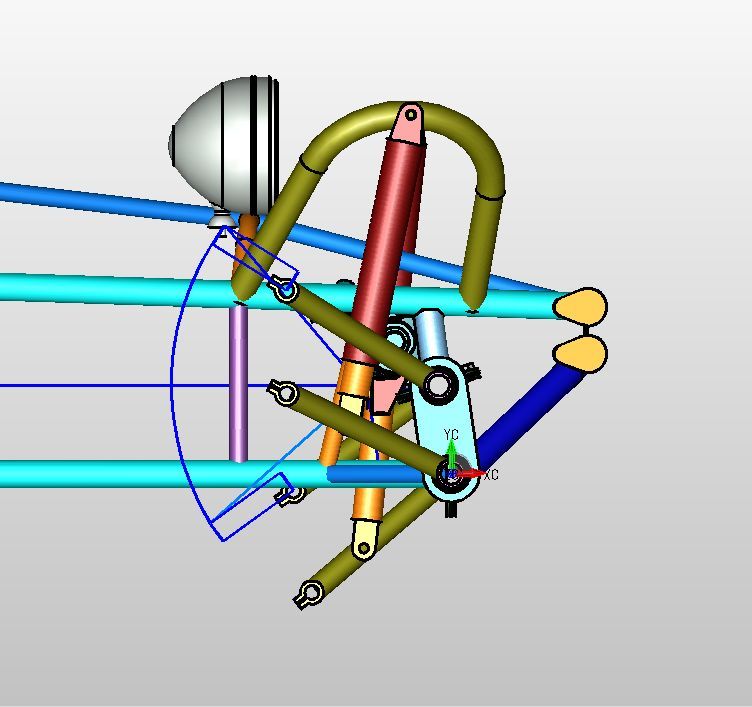
|
|
| Author: | Red Barron [ Wed Jan 30, 2013 3:41 pm ] |
| Post subject: | Re: Sandbar Norm's Slow Rebuild |
Norm, the hoop brace may interfere with your tie rods |
|
| Author: | Sandbar Norm [ Wed Jan 30, 2013 3:56 pm ] |
| Post subject: | Re: Sandbar Norm's Slow Rebuild |
Barron, You maybe right, It may but I don't think so. In the last image where you see the blue arc and line going to my tie rod bracket. I also move my bracket and lines to show where my tie rods would be at each end of my travel as it would be turned lock to lock. I think it will clear but I will be putting the supports in last so I will check in the real world build. Which way will it be stronger? I kind of like the way I have it now because it doesn't block my lights. |
|
| Author: | MadMike [ Wed Jan 30, 2013 7:32 pm ] |
| Post subject: | Re: Sandbar Norm's Slow Rebuild |
What you have planed will work fine. You are running Fox air shocks there right? Also remember the limit strap assembly you will need. Tack everything in and build around it to make sure everything works. |
|
| Author: | Psycho Alpha [ Wed Jan 30, 2013 8:05 pm ] |
| Post subject: | Re: Sandbar Norm's Slow Rebuild |
That's some good stuff Norm. I wish I had the skills and equipment for Cad. Maybe some day but for now I will just have to do it all in my head and trial and error. |
|
| Author: | Red Barron [ Wed Jan 30, 2013 8:14 pm ] |
| Post subject: | Re: Sandbar Norm's Slow Rebuild |
Psyco, you can get a cad light or the is a sketch up program free down load if your interested. I just purchased a version of tube works which is really cool. |
|
| Author: | Psycho Alpha [ Wed Jan 30, 2013 8:23 pm ] |
| Post subject: | Re: Sandbar Norm's Slow Rebuild |
Red Barron wrote: Psyco, you can get a cad light or the is a sketch up program free down load if your interested. I just purchased a version of tube works which is really cool. Thank I will look into that. My wife will be thrilled more of my time spent on buggy's |
|
| Author: | Sandbar Norm [ Thu Jan 31, 2013 7:38 am ] |
| Post subject: | Re: Sandbar Norm's Slow Rebuild |
Mike, yes I'm going to use 2" fox air shocks no the front. That's the plan is to build my stuff here at work and take it home (and hope it fits) and tack it on and see it it works. Psycho, using a cad does help with your design. The one thing is you have to take really good measurements of what you are building to or attaching to. But I guess you would have to do that without a cad system too. I will say that I have change the shock hoops like 5 times. I even put shock towers on the beam. I was thinking about going to go with a double shear hoop setup. With the hoop attaching from the frame on the rear side and to the end of beam on the front with a clamp and going around the outside of the shock. Then attaching a hoop support on the inside on the shock going to the cross brace. But in the end I like the looks of this design. But that may still change. Norm |
|
| Author: | Sandbar Norm [ Mon Apr 29, 2013 4:16 pm ] |
| Post subject: | Re: Sandbar Norm's Slow Rebuild |
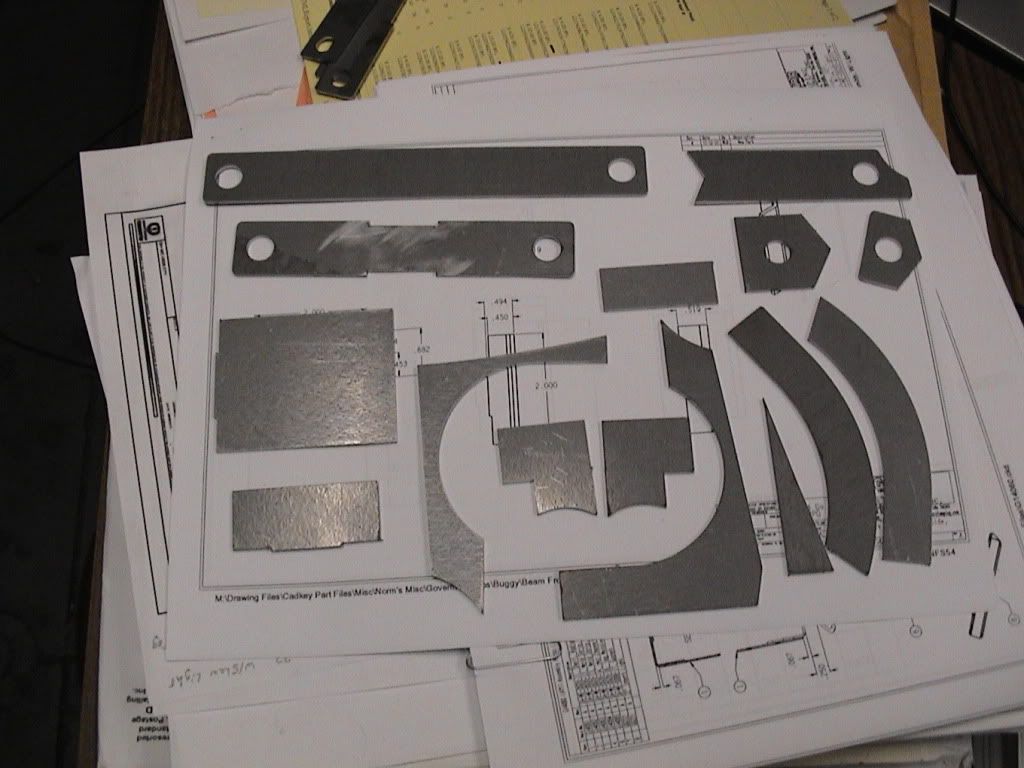
I found some time to work on my buggy yesterday (Free day with out kids stuff going on). Put on my shock hoops. I decided to make my hoop support tubes connect to the end of my beam and to the center of the shock hoop where the shock boss will be. Here's some pic. Fixture for hoops/shock boss.   Hoops cut and fitted.   Parts for my version of a hook and pin trailing arm stop.    And my hoop support. It will be welded to the center of the hoop. The next time I get to work on it. 
|
|
| Author: | MadMike [ Mon Apr 29, 2013 4:26 pm ] |
| Post subject: | Re: Sandbar Norm's Slow Rebuild |
And I thought I was the only one to over think things. Excellent job Norm, true professional build. |
|
| Author: | jesse [ Tue Apr 30, 2013 9:45 pm ] |
| Post subject: | Re: Sandbar Norm's Slow Rebuild |
What happened to the days of just eyeballing it lol btw very nice work |
|
| Author: | fortydegnorth [ Tue Apr 30, 2013 10:09 pm ] |
| Post subject: | Re: Sandbar Norm's Slow Rebuild |
jesse wrote: What happened to the days of just eyeballing it lol btw very nice work I squint my eyes and hold a tape measure. Makes it look like I know what I'm doing. I don't have the patience to build the fixtures, but sometimes I wish I did. Project is looking great. |
|
| Author: | Sandbar Norm [ Wed May 01, 2013 7:45 am ] |
| Post subject: | Re: Sandbar Norm's Slow Rebuild |
I do eveball build the things that don't matter much if its close. For my front shocks location thou, I know that they are most efficient when they are setup 90 deg. from the trailing arm at full compression. I'm using a 10" shock, my shock boss travels about 9" so I wanted to put the top mount as far forward and be in the center of the shock travel with out hitting my beam or trailing arm. I'm using the fixture as a drill fixture and to locate the upper shock boss. If I planed it right the shock should clear my beam at full extension. Then again I'm in Fl. and probably never use all the travel so I probably did not need set it up this way. I needed to do something so I did it my way (good or bad). My buggy build is my hobby and building it is a little different than other peoples part of the fun. Who know maybe somebody may like my version of something. I work with cad system and program a few different machines at work. So government jobs are our raises. I have a few government jobs going on for the guys in the shop now (2 10ga SS bbq grills, a still for making vodka, a SS mirror frame, tortilla press and chair for stretching your legs for sports injuries). Norm Edited, 1st and probably only fixture that I will make for this buggy. |
|
| Page 1 of 2 | All times are UTC - 5 hours [ DST ] |
| Powered by phpBB® Forum Software © phpBB Group https://www.phpbb.com/ |
|