|
All times are UTC - 5 hours [ DST ] |
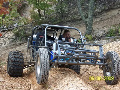
Extra Support for the Roll Cage
Moderator: JeffClay
 
|
Page 1 of 1 |
[ 10 posts ] |
|
| Author | Message | |||||
|---|---|---|---|---|---|---|
| MickeyMouse |
|
|||||
Joined: Tue Jan 08, 2008 8:53 pm Posts: 3056 Location: Atlanta, GA |
|
|||||
| Top | ||||||

| NRIbuggys |
|
||||
Joined: Mon Jan 10, 2011 12:52 pm Posts: 917 Location: Calera, Alabama |
|
||||
| Top | |||||

| diamonddav |
|
||||
Joined: Mon Apr 28, 2008 1:49 pm Posts: 1107 Location: cinti,oh |
|
||||
| Top | |||||
| nitro_mudder |
|
|||||
Joined: Mon Oct 27, 2008 9:12 pm Posts: 3891 Location: Fort Wayne, IN WoodsBuggy - NOMAD Chapter |
|
|||||
| Top | ||||||


| Bikepainter |
|
|||
|
Joined: Sat Jul 07, 2012 12:24 am Posts: 9 Location: Ouachita mountains Arkansas |
|
|||
| Top | ||||
| MickeyMouse |
|
|||||
Joined: Tue Jan 08, 2008 8:53 pm Posts: 3056 Location: Atlanta, GA |
|
|||||
| Top | ||||||
| jesse |
|
|||||
Joined: Fri Nov 30, 2007 4:03 pm Posts: 3181 Location: leeds alabama |
|
|||||
| Top | ||||||


| Rick |
|
||||
Joined: Fri Dec 28, 2007 3:44 pm Posts: 976 Location: franklin indiana |
|
||||
| Top | |||||

| giveitagallon |
|
|||||
Joined: Tue Sep 08, 2009 4:43 pm Posts: 1847 Location: rittman,ohio ----------- wellsville, water cooled chapter |
|
|||||
| Top | ||||||

| aboone993 |
|
|||||
Joined: Thu Jul 31, 2008 8:26 pm Posts: 1125 Location: Gadsden TN |
|
|||||
| Top | ||||||
|
|
Page 1 of 1 |
[ 10 posts ] |
|
All times are UTC - 5 hours [ DST ] |
Who is online |
Users browsing this forum: No registered users and 39 guests |
| You cannot post new topics in this forum You cannot reply to topics in this forum You cannot edit your posts in this forum You cannot delete your posts in this forum You cannot post attachments in this forum |