WoodsBuggy.com
http://www.woodsbuggy.com/phpBB3/

Buggy rebuild (Frame ID requested)
http://www.woodsbuggy.com/phpBB3/viewtopic.php?f=23&t=13293
Page 1 of 2

Author:  Marine1 [ Sun Mar 04, 2012 8:59 pm ]
Post subject:  Buggy rebuild (Frame ID requested)

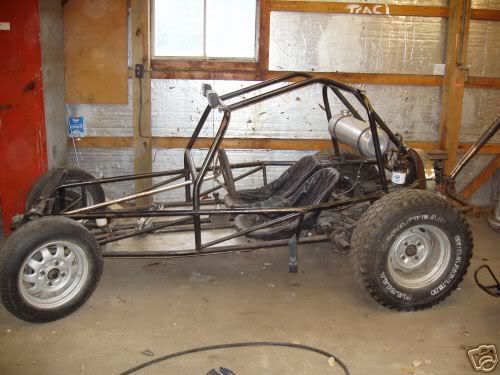
So I finally got my rail over to my place and settled into the garage. Did some wiring tonight, and removed the junk fiberglass seats. This will serve as my build thread and my starting point. I'm wanting to build a fun, reliable buggy for hills and trails. I bought the buggy semi-running for $800 from my cousin. To get it running normally I had to adjust the valves and replace the generator. So heres the run down

What it has
1641 Dual port
Single Solex PICT 34-3 carb
Pertronix electronic ignition
3 rib Trans
Bus torsion
Wilwood calipers, disc
Cut 32x11.50 mud tires
Two handle cutting brake

What I've done up to this point
New generator
New cap and rotor
Adjusted valves
Adjusted carb
Rewired


Plans for this build/rebuild
2x3 trailing arm kit
New tierod ends
Bolted and TN cut 31" super swampers
Rework shifter setup
Dual Weber 34's or Kadrons
Kirkey seats
New 5 point belts
4 more lights up front
2 lights in rear for backing up at night
Clean up some booger welded non-essential brackets
Sand and paint some of the rough spots

More as I go

Heres some pics as it sits now. It was running, but the rotor broke the tab in the distributor. So I just replaced that, but went ahead and have started the rewire and removed the seats. I'm on a tight budget, so it'll be a step by step, and trying to get as much riding time as possible in between mods.

If anyone can identify this frame, please let me know what it might be. Thanks

Image
Image
Image
Image
Image

Author:  gasman [ Sun Mar 04, 2012 9:23 pm ]
Post subject:  Re: Buggy rebuild (Frame ID requested)

Good deal for an $800 buggy.who ever added those back bars made it look pretty good.usually those buggies with frame dropping down in front of the motor don't look very good but they did good job on that one.nice buggy.Chad :mrgreen:

Author:  ron [ Sun Mar 04, 2012 9:58 pm ]
Post subject:  Re: Buggy rebuild (Frame ID requested)

gasman wrote:
Good deal for an $800 buggy.who ever added those back bars made it look pretty good.usually those buggies with frame dropping down in front of the motor don't look very good but they did good job on that one.nice buggy.Chad :mrgreen:


i agree with gasman ,
man you stole that buggy at that price , great starter buggy to modify to your liking !!! :wink:

Author:  aboone993 [ Sun Mar 04, 2012 10:03 pm ]
Post subject:  Re: Buggy rebuild (Frame ID requested)

looks alot like a little rebel with a long back kit on it (but not sure ) Berrin buggies also made a short back frame as well . which ever it is nice score for $800

Author:  Marine1 [ Sun Mar 04, 2012 10:15 pm ]
Post subject:  Re: Buggy rebuild (Frame ID requested)

Thanks guys. yeah I'm happy, especially since the $800 included a ready to pull buggy trailer also. I'll throw pics of it up tomorrow.

Author:  Firebug [ Sun Mar 04, 2012 10:26 pm ]
Post subject:  Re: Buggy rebuild (Frame ID requested)

Marine1 wrote:
Thanks guys. yeah I'm happy, especially since the $800 included a ready to pull buggy trailer also. I'll throw pics of it up tomorrow.

your cousin really likes you

Author:  gasman [ Sun Mar 04, 2012 10:27 pm ]
Post subject:  Re: Buggy rebuild (Frame ID requested)

aboone993 wrote:
looks alot like a little rebel with a long back kit on it (but not sure ) Berrin buggies also made a short back frame as well . which ever it is nice score for $800

That's what I was thinking a rebel,but kinda looks longer like a berrin.I'd say berrin since it has the body kit.either way they did a good job on adding the back to it. Chad :mrgreen:

Author:  Marine1 [ Sun Mar 04, 2012 10:36 pm ]
Post subject:  Re: Buggy rebuild (Frame ID requested)

Firebug wrote:
your cousin really likes you


Yes, yes he does. Running buggy, with new Pertronix ignition, new wilwood brakes, and a good trailer for $800. I got lucky

Author:  Marine1 [ Tue Mar 06, 2012 2:19 pm ]
Post subject:  Cooling tin removal and carb mods today

Ok guys today I pulled the cooling tins, the number spark plug hole is stripped, so I had to remove them to get it ready for a helicoil. But while I was at it. I decided to go ahead and document my cheap bastard offroad racing PICT 34/3 carb mods. Basically this is to make the carb flow a little more CFM, have less to go wrong, and make it run better over rough terrain and severe angles. This isn't done yet, I still have work to do to get rid of the PICT 34/3 & 009 combo bog that these motors are world famous for, but this is the first rendition.

On to the pics

Ok first things first, to smooth out flow and get a few extra CFM I deleted the choke rod, butterfly and screws.

Image

No with that gone, there is no reason for the big chunk of aluminum made to house the automatic choke components. So 15 minutes with a hacksaw and we have a much smaller carb that takes up less space and looks cleaner.

Image

Image

Image

Now with that done, it was time to clean up the other side of the carb. Out comes the hacksaw again. I cut the idle fuel cutoff switch right at the nut. I dont have pics, but after you cut it off you basically have a hollow bolt. Fill this bolt completely with RTV, JB weld, ETC. This is what it looks like with that piece gone.

Image

Now one issue with these carbs is fuel spilling out the bowl vent into the throat and causing serious issues on steep climbs and rough terrain. To deal with this there are to methods. I'm showing the simple one right now, but I will be doing a different mod which will be posted later because I don't like the airflow disruption of this way. This method is as simple as clamping a piece of 1/4" fuel line to the vent and routing it out the aircleaner.
Image

The second version I will be working on later this week is to block the stock bowl vent, drill and tap a 1/8th npt nipple into the bowl and run the vent line up the frame. I will be showing that later on as the build goes.

To deal with the bog, I adjusted the acc. pump to produce the max amount of fuel on each squirt. I also aimed the acc. pump nozzle straight down the barrel. Another mod thats up coming that I will also be showing is to remove the throttle plate and solder the hole is the plate closed to produce more vacuum under the plate and draw more fuel at idle and part throttle.

Well this is it for now, the build will continue slowly and hopefully I'll have exactly what I want before the end of the year. Thanks for tuning in guys

Author:  nitro_mudder [ Tue Mar 06, 2012 3:42 pm ]
Post subject:  Re: Buggy rebuild (Frame ID requested)

Berrien 902 shortback that has had rear cage added. That was my first buggy too, paid $500 running, but yours is much better.

Author:  Marine1 [ Tue Mar 06, 2012 5:27 pm ]
Post subject:  Re: Buggy rebuild (Frame ID requested)

nitro_mudder wrote:
Berrien 902 shortback that has had rear cage added. That was my first buggy too, paid $500 running, but yours is much better.


Thanks for the knowledge, that makes my life easier.

Author:  nitro_mudder [ Tue Mar 06, 2012 5:40 pm ]
Post subject:  Re: Buggy rebuild (Frame ID requested)

Image

Author:  reno2165 [ Tue Mar 06, 2012 5:46 pm ]
Post subject:  Re: Buggy rebuild (Frame ID requested)

helluva a deal on a good buggy, i like the body kit it has

Author:  Marine1 [ Sat Mar 10, 2012 11:38 pm ]
Post subject:  Re: Buggy rebuild (Frame ID requested)

Buggy is finally back together and ready to ride for now. Carb has been completely reworked (Knife edged throttlw plate, choke deleted, externally vented with npt fitting, venturi smoothed, and rejetted) New shift knob mounted, new breather mounted, rewired, exhaust megaphone cut and tractor cap resized, and driver seats remounted with 5 1/2" grade 8 bolts. Also mounted mirrors for back off a hill, and mounted fire extinguisher On to the pics

Image

Image

Image

Image

Image

Author:  rockrockets1 [ Sun Mar 11, 2012 1:43 pm ]
Post subject:  Re: Buggy rebuild (Frame ID requested)

Put the fire extinguisher in the bottom of the buggy .It will come loose and hit you in the head.And if it don't you will never get it out in time to use it if it is attached that good .I ran mine on my shifter plate attached with zip ties so I could rip it away when needed

Author:  Marine1 [ Sun Mar 11, 2012 2:15 pm ]
Post subject:  Re: Buggy rebuild (Frame ID requested)

rockrockets1 wrote:
Put the fire extinguisher in the bottom of the buggy .It will come loose and hit you in the head.And if it don't you will never get it out in time to use it if it is attached that good .I ran mine on my shifter plate attached with zip ties so I could rip it away when needed

You think it'll come loose even in a racecar mount? I rally raced with it in my wrx and its never tried coming loose but if you think it will Ill go look for a diff. Place to mount it up. Thanks for the advice buddy

Author:  Marine1 [ Sun Mar 25, 2012 6:58 pm ]
Post subject:  Re: Buggy rebuild (Frame ID requested)

Up and running now

Image

Image

Author:  Marine1 [ Thu Mar 29, 2012 5:46 pm ]
Post subject:  Re: Buggy rebuild (Frame ID requested)

New tires, and took it for a nice slow put around the creek with the wife in tow

Image

Image

Image

Image

Image

Image

Author:  Marine1 [ Thu Mar 29, 2012 8:43 pm ]
Post subject:  Re: Buggy rebuild (Frame ID requested)

Tool box mounting. Two 24" pieces of 6" I.D. pvc mounted on the rear frame rails. Left side is bolted, right side is waiting on the drill battery to charge lol. Then I gotta go pick up some screw outs and I'm in busy. Cheap, strong, and convenient .

Image

Author:  Marine1 [ Thu Mar 29, 2012 9:42 pm ]
Post subject:  Re: Buggy rebuild (Frame ID requested)

Both tool tubes mounted, lights remounted, and engine cover mocked up

Image

Author:  Marine1 [ Sun Apr 01, 2012 8:34 pm ]
Post subject:  Re: Buggy rebuild (Frame ID requested)

Took it out for the first ride at bitter creek. Ran ok, bad miss on the top end from a too lean main jet, Image
Image

Pulled the motor to fix the rear main leak. While its out gonna have the flywheel shaved to 10 lbs to help it come up faster. Found out the crank is 8 dowel pins, now I'm not sure if its as stock a motor as I was told. Also had the red rear main in it. End play seems ok, hoping it turns out alright. Plans while motor is out:
Drill main and idle jets, and accelerator pump nozzle. Machine flywheel down to less than 12 lbs. Add 4 puck clutch disc. Replace all 4 plugs, points, and condenser. Possibly send electronic ignition off and get it fixed (pending warranty info). Have Larry Lively at the Speed Shop (wild bill) tune it on the stand to make it run as well as possible. As it sits tonight

Image
Image

Image

Author:  gasman [ Sun Apr 01, 2012 8:48 pm ]
Post subject:  Re: Buggy rebuild (Frame ID requested)

Lol,a vw motor in a suby!
Image
Chad :mrgreen:

Author:  aboone993 [ Mon Apr 02, 2012 8:53 pm ]
Post subject:  Re: Buggy rebuild (Frame ID requested)

looks good ! Make sure you replace the oring in the flywheel also .

Author:  Maddog [ Mon Apr 02, 2012 9:26 pm ]
Post subject:  Re: Buggy rebuild (Frame ID requested)

It will be hard to look through those tubes, when you have to back off a steep hill.

Author:  nitro_mudder [ Mon Apr 02, 2012 10:07 pm ]
Post subject:  Re: Buggy rebuild (Frame ID requested)

That was my first thought. And keep the tubes lightly filled or they may crack when bouncing. And she will bounce lol.

Maddog wrote:
It will be hard to look through those tubes, when you have to back off a steep hill.

Page 1 of 2 All times are UTC - 5 hours [ DST ]
Powered by phpBB® Forum Software © phpBB Group
https://www.phpbb.com/